
This DIY deck build kicked off our entire backyard transformation, and it was long overdue. Here’s how I turned a rough, nail-popping eyesore into something that still looks brand new years later.
Why the old deck had to go
The frame underneath was solid, but everything on top was a disaster. Cheap treated-wood planks, curling boards, popping nails — I was genuinely worried my dog would hurt his paws. It had been repainted multiple times and still looked terrible. The stairs were poorly built. It was time to strip it all down and start fresh.


Scoring materials on a budget
I found a surplus store carrying Trex composite decking in two colors — boards up to 20 feet long — at a fraction of retail. They were just old stock in perfect condition. For the deck railing, I went with a black aluminum railing system from Home Depot with tinted glass panels — there are several compatible brands out there that look and install nearly the same way, so pick whatever your local store carries. Framing lumber (2×10, 2×12) came from Home Depot. The combination of composite decking and aluminum glass railing means virtually zero maintenance for years.
Prepping the frame — the steps I always do first
Before a single composite board went down, I did three things.
First, joist tape. I ran black butyl decking tape (Home Depot) along the top edge of every joist before any decking went on. Water sits on top of joists, seeps into screw holes, and rots the frame from the top down. Joist tape seals the screw penetrations and shields the wood. On my build I treated this as mandatory — for me it’s the kind of detail that decides whether a deck still looks new in 10 years or starts rotting from the joists down.
Second, landscape fabric and gravel underneath. I laid landscaping fabric (Amazon) across the entire ground footprint under the deck and weighted it with a layer of gravel to keep it in place. Nothing grows under there now — no weeds, no surprises.
Third, flashing the ledger. Where the deck meets the house, water management is everything. Depending on your siding, there are several ways to tuck metal flashing up under the siding so water rolls onto the deck surface instead of running down behind the ledger board into the wall cavity. I took my time on this detail because on my build, getting it wrong would have meant rot in the rim joist and the house framing behind it.


How I planned my railing posts before laying any decking
This is the kind of detail I’m glad I planned ahead for. Depending on the deck railing system, posts mount differently — some bolt to the rim joist from the outside, others get through-bolted from below, and most need solid wood underneath the decking where the post lands.
I mapped out every railing post location before I finished framing. Wherever a post was going to land, I built in a solid wood block between the joists so I’d have something solid to bolt into later. In my case, since I was adding extra perimeter framing for the picture-frame deck pattern anyway, I tied in additional lumber blocks at every post location while I was already in there with the saw and the screws.

The build: picture-frame deck layout & hidden fasteners
I extended the frame by adding doubled-up joists on one side to create a small landing for a second set of stairs. That meant the stairs needed somewhere to land, so I poured a small concrete pad myself. Rented a concrete mixing cart, mixed and poured with my dad helping.
I stripped the old decking in about a day. The real labor was setting up for a picture-frame deck pattern. That meant building an entire perimeter of perpendicular framing so the border boards could run in the opposite direction from the field boards.
I laid the perimeter first in the accent color, then filled in the long center runs. Because the boards were so long, there were almost no joints — very clean lines.
How I marked the perimeter cuts
I wanted a clean picture-frame look — every field board meeting the border at exactly the right length, with an even gap along all the cuts and angles. No overhangs. No mismatched spacing. After watching a stack of YouTube videos, here’s the method that actually worked for me:
- I laid the field boards across the joists with their ends running long, hanging well past the perimeter framing.
- I placed a border board on top, exactly where it would land in the finished deck.
- I traced the inside edge of the border onto each field board underneath. That gave me a cut line marked individually for each board, so every fitment came out custom to its position.
- Then I pulled the field boards, cut them, and dropped them back in.
For the cut itself, I clamped a metal straightedge across the deck with Vise-Grips and ran my circular saw along it.


Hidden fasteners across the field
I used hidden clips across the field so no visible screws would show on the main surface. A few face screws along the perimeter border where the accent boards lacked grooves. With two different colors used for the picture-frame layout, the effect goes from clean to striking — every field board cut hits the border at the same line and angle, creating a subtle 3D depth where the colors meet.


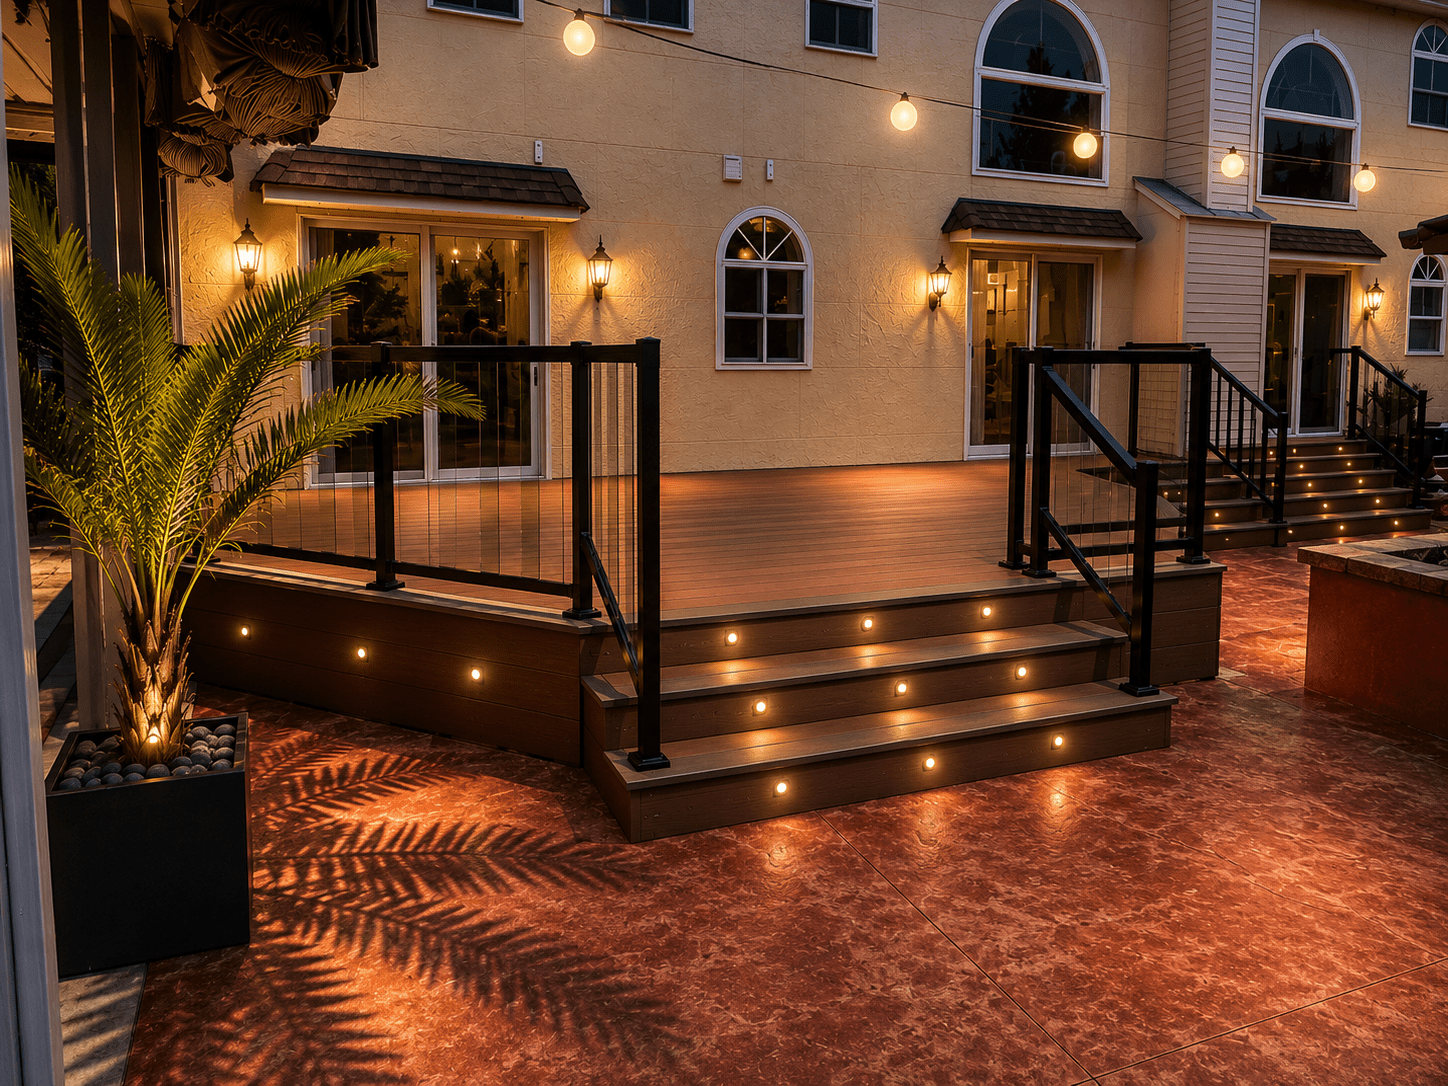
Installing the aluminum glass railing — section by section
The system is straightforward in parts: black aluminum posts, a top rail and a bottom rail that both have slots cut along their inside faces, and tinted glass panels that slide into those slots. Posts get lag-bolted to the deck, rails span between posts, glass fills the section. Most aluminum railing systems on the market work this same way — what’s below applies whether you go with Home Depot stock or another compatible brand.
There are plenty of ways to put a railing like this together — I’m just sharing what worked for me. The order I followed was section by section, bolting each post down only after the section between it and the previous post was fitted. For my build, that meant cutting every top and bottom rail to its specific section, spacing the glass panels evenly inside that section, and leaving the post-to-deck lag-bolts for the very last step so I had room to adjust the post position right up until I bolted it down.
How I worked through each section
- I bolted the starting post to the deck first. I picked a corner post as my fixed reference point, lag-bolted it down to the deck, and started building panels outward from there. Every other post after this one stayed loose until its section was fitted.
- Stood the next post in position but didn’t lag-bolt it yet — left it loose so I could shift it as I fitted the section between it and the post I’d just locked down.
- Cut the top and bottom rails to length for that specific section.
- For a normal-length section, I pre-built on the deck. Laid the top rail, bottom rail, and glass panels flat on the deck surface, dropped the glass into the slots, and assembled the whole section on the ground. Then — with a second pair of hands, one of us on each end — we lifted the assembled section as a unit, one person holding the top rail and one holding the bottom, carried it up between the posts, and screwed it to the posts.
- For a long, heavy section, I didn’t pre-build. Instead I secured the top and bottom rails between the posts first, then slid each glass panel in one at a time from the open end — the end where the next post would eventually go. Panels in, spaced, then the next post closed off the section.
- Lined everything up before bolting down the post. With the section hanging between the two posts, I leveled the rails, squared the post, spaced the glass evenly, and only then pre-drilled the four lag-bolt holes through the post base and bolted the post down to the deck.
- Moved to the next section and repeated. Stood the next post, cut rails, built or slid the section, lined up, bolted down. Walked the perimeter in one continuous loop until I got back to where I started.


A second staircase and a small concrete pour
The reason I built it this way was to make sure every glass panel ended up equally spaced and every rail lined up clean. Working section by section from a fixed starting post let me size each rail to its actual gap, place each panel evenly within its section, and keep the rest of the perimeter adjustable right up until each post got bolted down. That’s the result I was after.

Custom LED deck lighting everywhere


My LED build — RGB strips in the railing, recessed circle lights across the deck, and 4 by 4 fixtures in the skirting. All three circuits running off one 12V controller.
One thing up front — a safety note. I have a construction background, so I’m comfortable working with low-voltage 12V DC wiring (the kind I run for the LEDs here). That side is genuinely safe to handle. But any work involving 110V household power — pulling a new circuit from the panel, hard-wiring fixtures into mains, tying into a junction box on the house side — should be done by a licensed electrician. Line voltage is not a DIY job. Hire a pro for the mains work, then let them feed your low-voltage transformer.
With that out of the way — I ended up running three separate lighting circuits across the deck, all tied into one centralized 12-volt controller. Here’s how it all came together.
Circuit 1: RGB LED strips in the railings
The first circuit is RGB LED strip lighting I installed inside the top portion of the aluminum railing. Each section runs about four to five feet, and every single one had to be fished up from underneath, then physically soldered together. After soldering, I protected each connection from the elements with heat shrink tubing and silicone. Even though the strips sit inside a channel with a clear diffuser cover, for my build I treated that extra weatherproofing as non-negotiable. The strips run along the entire railing and down the stairs, casting ambient light from top to bottom. They’re controllable via remote or phone.
Circuit 2: recessed circle LED lights
The second circuit is small recessed circle lights I drilled into the decking along the perimeter near the house. Each one required a 5/8-inch hole, and the wiring had to be connected underneath the deck before the boards went down. I installed the first row of decking closest to the house, then climbed underneath to run all the wires while I still had easy access — once a deck is fully boarded up, crawling under there is miserable, which is why I ran the wires before closing it up. These are also RGB, running on four-wire connections, and they tie into the same controller as the railing strips.
Circuit 3: LED skirting lights
The third circuit sits at the lowest point — inside the composite skirting boards. I cut 3×3-inch openings and installed 4×4-inch LED fixtures with black louvered covers. The challenge: I could only find these in 110-volt versions. So I disassembled each fixture, removed the cheap built-in transformer, and wired the LEDs directly to 12-volt DC. That let me run them off the same centralized low-voltage controller as everything else. Since these aren’t RGB — just standard lighting — they only need two wires instead of four.
Important — this is simply how I did it for my own project. It is NOT a recommendation. I am not telling you to open up new LED fixtures and strip out their internal parts. I needed all three circuits to run off the same centralized 12V controller, so I modified mine to make that happen. Take this as a story of what I did, not as a how-to. Don’t cut, modify, or rewire line-voltage fixtures — if you want a centralized setup like this, talk to a licensed electrician about the safest way to get there for your specific gear.
One controller to control them all
The whole point of this setup is centralized control. All three circuits power on and off together from one 12-volt DC transformer and controller. The transformer plugs into a standard 110V outlet — if that outlet doesn’t exist where you need it, again, get an electrician to install a proper outdoor-rated GFCI outlet for you. Once the transformer is fed, the 12V side is yours to play with.
Yes, running three separate wire circuits took time, and there’s a lot of soldering involved. But LED lights draw very little power, and for my build keeping everything on low voltage made the system safer and more reliable. The result is a deck that transitions beautifully from day to night with layered, customizable lighting at every level.


For the complete transformer and controller panel setup — wiring, enclosure, circuit layout — see the dedicated build post: LED Lights Controllers / Transformer Panel Build & Setup.
Deck skirting — horizontal composite with exposed black hardware
For the deck skirting I skipped the typical lattice (a look I’ve never liked) and used 12-inch wide × 1/2-inch thick composite skirt boards mounted horizontally. A few details I worked through for my build:
- Mid-span support. Composite expands and contracts with heat and cold, so on my long horizontal runs (anything over 36 inches) I added a vertical support in the middle of each span to keep the board from bowing. Without that backing my boards would have warped within a season.
- Oversized flush-set screw heads as a design feature. I used black lag-style screws (Home Depot) with large flat heads and pre-drilled the corners with a counterbore so the heads sit perfectly flush with the panel face. Two reasons I went this route — function: the larger head clamps a wider footprint of the board against the framing, which I figured would hold better against wind than a small screw head. Looks: an oversized head in a contrasting color reads to me as a deliberate reveal detail — like cladding fasteners on a modern facade, not hardware I was trying to hide.
- Torx over Phillips. I went with Torx heads because they stay clean — no chewed-up star pattern after install, no rust streaks from damaged slots. That’s why I avoided Phillips on this build.
- Screws laid out on horizontal and vertical lines. I measured every position so the heads would sit in matching rows across the board face. From a few feet away the panels read as a tight, gridded, flush-finished surface.
- Gaps between boards. I left these for ventilation and because I think it reads cleaner than solid skirting.

Side skirting going up — composite boards spaced 1/2 inch apart with the flush-set screw grid.


I used the same technique on the custom fence build later in the yard. Oversized flush screw heads in a contrasting color, set on a measured grid — for me it’s a cheap way to make budget composite panels look like architectural cladding.
Pro tip: how I actually install them
The way I get all the screw heads to line up perfectly is by doing the layout before I commit any holes. Here’s the sequence I follow every time:
- I clamp the panel in position. Two clamps hold the board flat against the vertical surface so I can work hands-free.
- I mark every screw location. I measure and mark the screw positions on each side — and in the middle if the run needs mid-span fastening — so every head will land on the same horizontal and vertical lines.
- I pre-drill a 1/8-inch pilot hole at each mark.
- I tack the panel with small temporary screws. Instead of going straight in with the big HEADLOK 2-7/8″ screws (Home Depot), I drive in small screws just to hold the panel in place so I can check the alignment.
- I hang the next panel with spacers. Two scrap pieces of 1/2-inch board act as spacers between panels. I tack that one the same way.
- I step back and check. Only when everything lines up and I’m satisfied with how the panels read as a set do I commit to the final fastening.
- I drill the through hole and counterbore. I remove the temporary screws one by one. First a 1/4-inch guide hole through the composite, then a 1/2-inch or 5/8-inch counterbore for the screw head to sit flush. To control the counterbore depth, I wrap a strip of masking tape around the drill bit at the exact depth I want — the drill stops when the tape touches the surface, no overdrilling. I run the drill at low speed so I don’t accidentally plunge through.
- I drive the final screws. Big head, flush face, clean grid.

The whole sequence sounds slow, but once I got into a rhythm it went fast — and for me the result is what made the difference between “screws holding a board on” and an intentional cladding detail.
I also built a tall privacy fence on one side using the same composite material to hide a messy storage area near where the garage would eventually go. Everything stays in the same color family.
⚠️ Disclaimer
The content on HOMEJECT is provided for informational and entertainment purposes only. The projects, ideas, methods, tools, materials, and techniques shown reflect my personal experiences and opinions based on my own DIY projects.
This content is not intended to serve as professional construction, engineering, architectural, electrical, plumbing, structural, safety, legal, or code-compliance advice. It should not be considered a step-by-step guide or instruction manual for any project.
Every property, structure, situation, skill level, and local building code is different. Before attempting any project, consult qualified professionals when appropriate and verify all applicable codes, permits, regulations, and safety requirements in your area.
By using information found on this website, you acknowledge that any actions you take are at your own risk. HOMEJECT and its owner assume no responsibility or liability for any injury, damage, loss, or issues that may result from the use of information presented on this site.
Final thoughts
The whole DIY deck project — framing, decking, stairs, glass railing, LED deck lighting, skirting, concrete pad — took me about five weeks working evenings and weekends. The deck is 20×18 feet, and years later it’s barely faded. For my build, composite decking and aluminum glass railing have absolutely been worth the investment for longevity and curb appeal.
This was just the beginning of our whole patio transformation — which later turned into our “all-inclusive patio” with a lot of cool features, including a DIY lamppost village and a whole tropical garden of cold hardy banana trees. More on that in the next posts.

Tools & materials
- Trex composite decking, two-tone (surplus store)
- Black aluminum railing system with tinted glass panels — Home Depot (multiple compatible brands available)
- 12″ wide × 1/2″ thick composite skirt boards
- Framing lumber, 2×10 and 2×12 — Home Depot
- Trex Hideaway hidden deck clips — Home Depot
- Black butyl joist tape — Amazon
- Landscape fabric — Amazon
- Metal step flashing (for ledger transition) — Menards
- Solid wood blocking for railing post mounts
- RGB LED strip lights + aluminum LED channels — Amazon
- Recessed round deck LED lights — Amazon
- 4×4 LED fixtures with black louvered covers (rewired to 12V DC) — Amazon
- 12V DC transformer + RGB Bluetooth controller — Amazon
- Heat shrink tubing + silicone (for waterproofing solder joints) — Amazon
- HEADLOK structural screws, 2-7/8″ black (lag-style, large flat head) — Home Depot
- Concrete mix + rented mixing cart
- Drill, circular saw, soldering iron, counterbore bit (1/2″ and 5/8″), metal straightedge + Vise-Grips, clamps, masking tape (for drill depth)
- Licensed electrician for any 110V/mains work or new outdoor outlets
Latest build on the site
More Builds You Might Like
- DIY Outdoor Kitchen: How I Turned a Sam’s Club Gazebo Into a Backyard Paradise
- DIY Patio Bar: How I Built an Enclosed Outdoor Coffee + Cocktail Room
- How I Built a Floating Outdoor Photo Gallery on My Patio Wall
Building a deck or outdoor structure? Use the free DIY home calculators on HOMEJECT to estimate concrete footings, framing materials, and more — all based on real project data.
Leave a Reply