
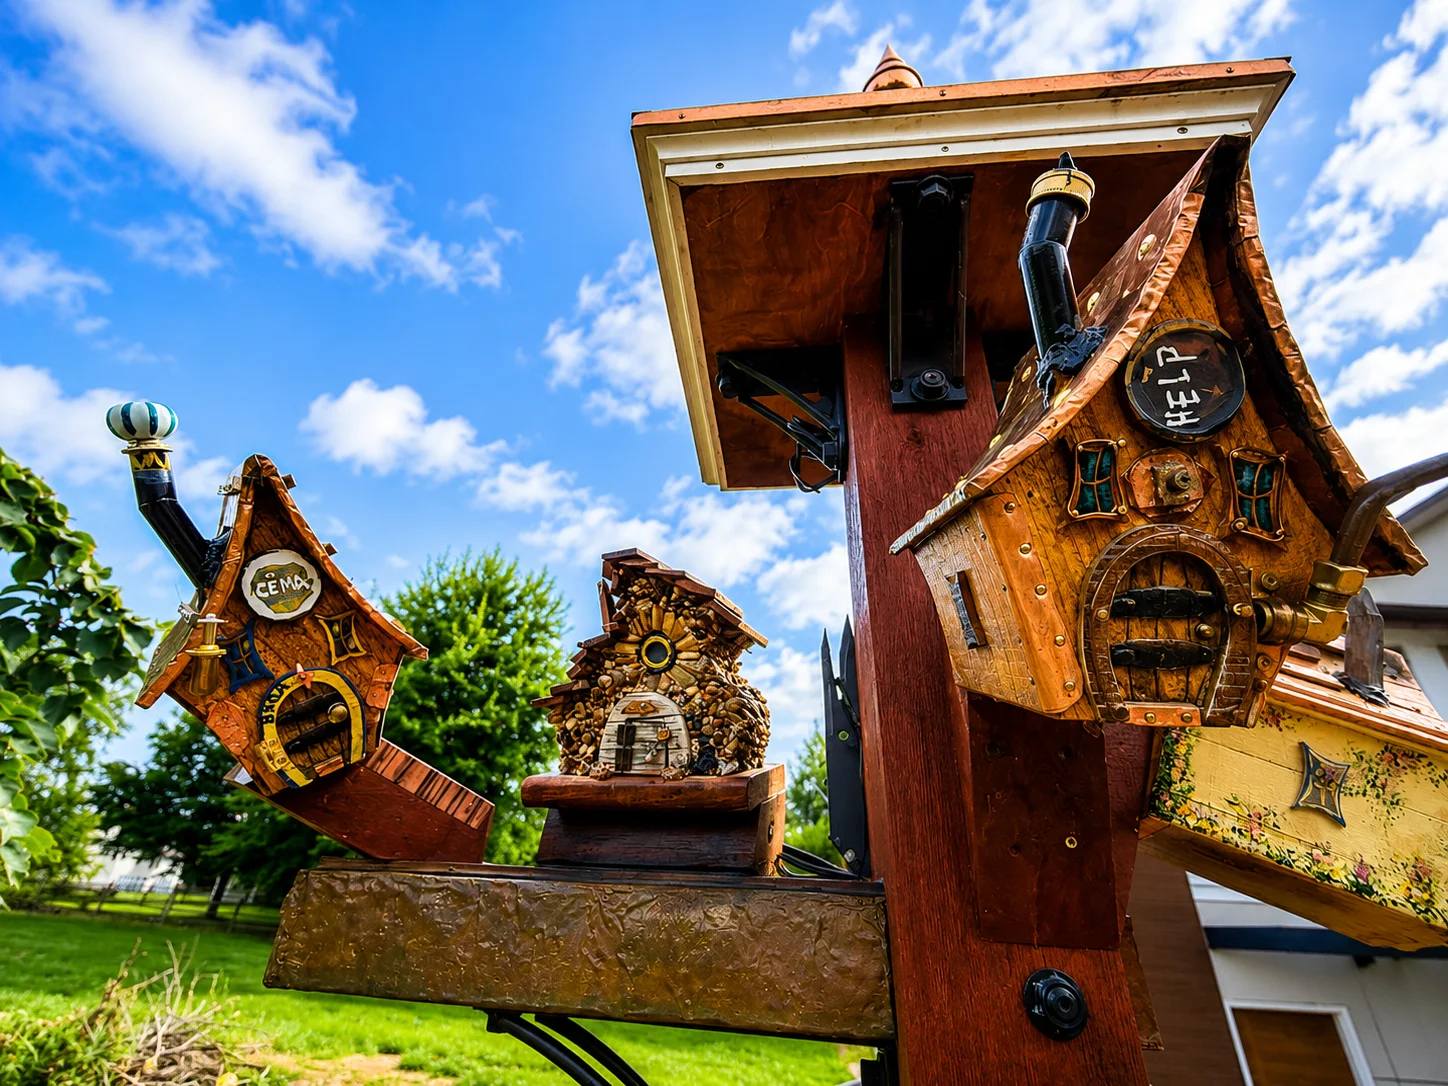


This DIY lamppost started as a plain 10-foot 6×6 by the putting green. It ended up as a copper-topped cupola, four handmade copper birdhouses floating on angled brackets and lit from inside, a forged medieval lamp with a flickering LED, and directional signs pointing to Tokyo, Rome and Hawaii at their true compass bearings. Here is the whole build, part by part.
What this DIY lamppost cost and how long it took
- Post, wood, hardware and bolts — about $350
- Forged lamp, LED lights and wiring — about $290
- Custom directional signs from Etsy — about $240
- Four custom birdhouses from Etsy — about $180
- Cupola, copper elements, stain and paint — about $130
- Total: roughly $1,190 in parts, built over about four weekends
This project started when we were finishing the patio extension by the putting green. The spot needed a lamppost — but I didn’t want a plain post. I’m a longtime fan of the Magic Kingdom and a bit of everyday magic, and I’d always dreamed of building something on our property that felt like a fairy-tale village. So that’s what I set out to make.
I sketched the design on paper myself. The idea was a tall, substantial post topped with a little copper-roofed cupola. One side would carry an old forged lamp — the kind you’d expect on a castle wall. The other side would hold a cluster of tiny houses, like birdhouses dressed in copper and brass, floating on the post like a miniature village. And below it all, a set of directional signs pointing to cities and countries around the world — Tokyo, Rome, Hawaii, Montreal, Chicago, New York, and more. That was the vision, and I decided to build it.
The Post
For the post, I picked up a 6×6, ten feet tall, from Menards. To anchor it, I used a heavy-duty 6×6 base bracket rated for four concrete anchors. It arrived in black, so no painting was required — a nice bonus.

The Cupola
For the crown, I found a 24-inch-by-24-inch cupola with a real copper top on the local marketplace. It was brand new with a few dents on the very top — invisible from the ground — so I got it for a fraction of the price. To mount it, I bought four 7×7-inch corner brackets on eBay; they came primed, so I painted them black.

The Copper-Wrapped Shelf Post
I needed a short shelf post to mount two of the houses, so I cut a 4×6 beam I had on hand down to 32 inches and wrapped it in a very thin copper film — both for the magical village look and to protect the wood from sun and weather. I kept every seam hidden at the bottom near the bracket and held the film in place with tiny copper nails. To attach it to the main post, I used a 12×12 bracket (also from eBay), which I primed and painted.

Painting Everything With 2K Spray Max
I’m a big fan of 2K Spray Max black — a two-component epoxy paint — and I used it on all the steel: the 12×12 bracket, the four cupola corner brackets, all of it. It lays down a tough, durable finish.
The Forged Medieval Lamp


The lamp was a real find. On eBay I came across a handmade forged lamp made by a blacksmith in Ukraine — medieval in style, with real painted glass (oak-leaf detailing and all). The maker shipped it all the way to me, and it’s genuinely beautiful; it has to be seen in person. Instead of a standard bulb, I fitted an LED flickering bulb, so at night it dances like candlelight in warm red and orange tones.
The Magical Houses
For the houses, I bought four custom birdhouses on Etsy. They were fairly plain on their own, so I used them as a foundation: I took each one apart and rebuilt it with real copper, brass, and salvaged plumbing parts. I added chimneys, clad every roof in copper (sealing each one against water), and used copper for door trim and accents. A fun touch — I capped the chimneys with kitchen cabinet door knobs for that storybook look.


I wanted each house to glow from within, as if there were life inside. So I cut small discs from recycled plastic bottles, glued them over the round birdhouse openings, and painted them to serve as little windows. Once the houses were finished, I sealed every surface — and the copper cupola — with two light coats of 2K Spray Max clear. It dries perfectly clear and adds the protection these pieces need. (Do it outside; the fumes are strong.)
The Angled Brackets for the Floating Effect

I didn’t want the houses lined up in a neat row. I wanted them floating at different angles, each tilted slightly downward so you can see it clearly from the ground. To do that, I cut pieces of treated 4×4 on my table saw at angles, so every house sits a little twisted and a little tipped — like an enchanted village that grew there on its own.
Wiring the LED Lights in Each House


As I mounted each house, I drilled a 3/8-inch hole and inserted a small 2-watt, 12-volt DC LED, soldered to 18-gauge wire to tie into the circuit. I siliconed each wire entry so no water could get in. Behind the four houses on the beam, I added a small junction box where all the wires meet and run to a low-voltage controller. The houses are on one circuit; the lamp runs on its own.
Staining the Post
For the post itself, I used PPG stain from Home Depot in a dark cedar tone — the same stain I used on my gazebo (you can see that in my DIY outdoor kitchen gazebo build). I applied two heavy coats for solid protection.
Assembly — Putting It All Together

With the stain dry, I anchored the base bracket, bolted the 6×6 to it, and started assembling. First, the four corner brackets went on with heavy lag screws, then the 24×24 cupola dropped onto them, screwed from behind with outdoor-rated screws. Next, lower down, I mounted the 32-inch copper-wrapped 4×6 onto the black 12×12 bracket with lag bolts.
Then came the fun part: positioning the houses. I set all four at slightly different heights and angles to build that floating-village effect. On one of the horizontal angled wood brackets, I used a piece of flashing to cap the top so water would not damage it, and I sealed every bracket-to-post joint. Everything was sealed and color-matched — dark wood with gold accents, copper roofs, the copper cupola, and the copper-wrapped post. It’s a lot of magic, in my opinion.
The Directional Signs


With the houses floating and the cupola up, I moved to the lower section and added the directional signs. I had most of them custom-made on Etsy — you specify the destinations and they make them — and a few I made myself. I sealed every sign with 2K clear, since the acrylic paint wouldn’t survive the elements unprotected. I even painted the mounting screws in different colors rather than leaving plain silver or black on a bright yellow sign. And a detail I love: I oriented each sign to its true compass direction — if Tokyo is west, the sign points west — with the real mileage on it.
The Moment It All Came to Life


When everything was wired into the outdoor circuit — controlled by a photocell and the controller — I waited for nightfall. When the sun went down, I couldn’t stop looking at it. Each tiny window glows in warm orange tones, so every house lights up from inside; you’d swear a little society of creatures lives in there. I called my wife and kids out to see it, and none of us could look away.
New builds like this one go out to the Homeject list first. Subscribe here.
That’s How We Built the Magic Post
That’s how the “Magic Post” came together: directional signs, a cluster of copper-and-brass storybook houses, and a forged medieval lamppost with flickering candlelight. I’ve listed the main parts below.
And one last thing—never stop creating. The world could always use a little more imagination, and your backyard, workshop, or home is the perfect place to start. Build something unique, build something meaningful, and most importantly, build something that brings a little magic into your everyday life.
Parts & Tools I Used
- Treated 6×6 post, 10 ft (Menards)
- Heavy-duty 6×6 post base bracket with concrete anchors (Amazon)
- 24×24 cupola with real copper top (MarketPlace , eBay or Home Depot)
- 7×7 cupola corner brackets (×4) and 12×12 mounting bracket (eBay)
- Thin copper film and copper nails (Amazon)
- 2K Spray Max black epoxy paint and 2K Spray Max clear coat (Amazon)
- Handmade forged medieval lamp (eBay) with an LED flickering bulb (Amazon)
- Four custom birdhouses (Etsy), plus copper sheeting, brass, and plumbing parts
- 3-watt 12V DC LED lights (×4), 18-gauge wire, junction box, and a low-voltage controller with photocell (Amazon)
- PPG stain in dark cedar (Home Depot)
- Custom directional signs (Etsy)
Some of the links above are affiliate links. If you buy through them, I may earn a small commission at no extra cost to you — it helps support these Homeject build posts. Thank you!
DIY Lamppost Village FAQ
How much does a DIY lamppost like this cost to build?
Roughly $1,190 in parts for mine. That breaks down to about $350 for the post, wood, hardware and bolts, about $290 for the forged lamp, LED lights and wiring, about $240 for the custom directional signs, about $180 for the four custom birdhouses from Etsy, and about $130 for the cupola, copper elements, stain and paint. You can build a simpler version for a lot less — the forged lamp, the signs and the handmade houses are where most of the money went.
How long does it take to build?
About four weekends. Most of that time went into rebuilding the birdhouses and waiting on paint and clear coat to cure between coats. The post, cupola and assembly itself is the quick part.
What size post do you need for a DIY lamppost?
I used a treated 6×6 at ten feet tall. A 6×6 is worth the extra cost here because it carries the cupola, the shelf beam and the houses without any flex. It sits on a heavy-duty 6×6 base bracket rated for four concrete anchors, which is what keeps a post this tall stable in wind.
How do you light birdhouses outdoors without running 120V?
Everything on this lamppost runs on low-voltage 12V DC. Each house gets a 3/8-inch hole and a small 2-watt 12V LED soldered to 18-gauge wire, with the wire entry siliconed so water cannot get in. All four wires meet in a small junction box behind the houses and run down to a low-voltage controller with a photocell. The houses share one circuit and the forged lamp runs on its own.
How do you get the floating village effect?
Angled brackets. I cut pieces of treated 4×4 on the table saw at angles, so each house sits twisted and tipped slightly downward rather than lined up in a row. Different heights on the post finish the effect — from the ground it reads as a village that grew there rather than four birdhouses on a board.
Will the copper and paint survive outdoors?
That is what the 2K products are for. All the steel got 2K Spray Max black, a two-component epoxy paint. The houses, the signs and the copper cupola got two light coats of 2K Spray Max clear. I also capped the top of the horizontal bracket with flashing and sealed every bracket-to-post joint. Spray the 2K outdoors — the fumes are strong.
Where do the birdhouses and directional signs come from?
Both started on Etsy. The four birdhouses were plain custom builds that I took apart and rebuilt with real copper, brass and salvaged plumbing parts, including copper-clad roofs and cabinet-knob chimney caps. Most of the directional signs were custom-made on Etsy (you supply the destinations) and I made a few myself.
Do the directional signs point the right way?
Yes. Each sign is oriented to its true compass bearing and carries the real mileage. If Tokyo is west from the patio, the Tokyo sign points west. It is a detail almost nobody notices at first, and the one everybody likes once you point it out.
Subscribe so you won’t miss the next build.
Related on Homeject: the 64×32 stamped concrete patio this post stands on, the 8-foot concrete fountain a few steps away, and the outdoor kitchen gazebo. More outdoor builds in the full Patio section.
Leave a Reply