
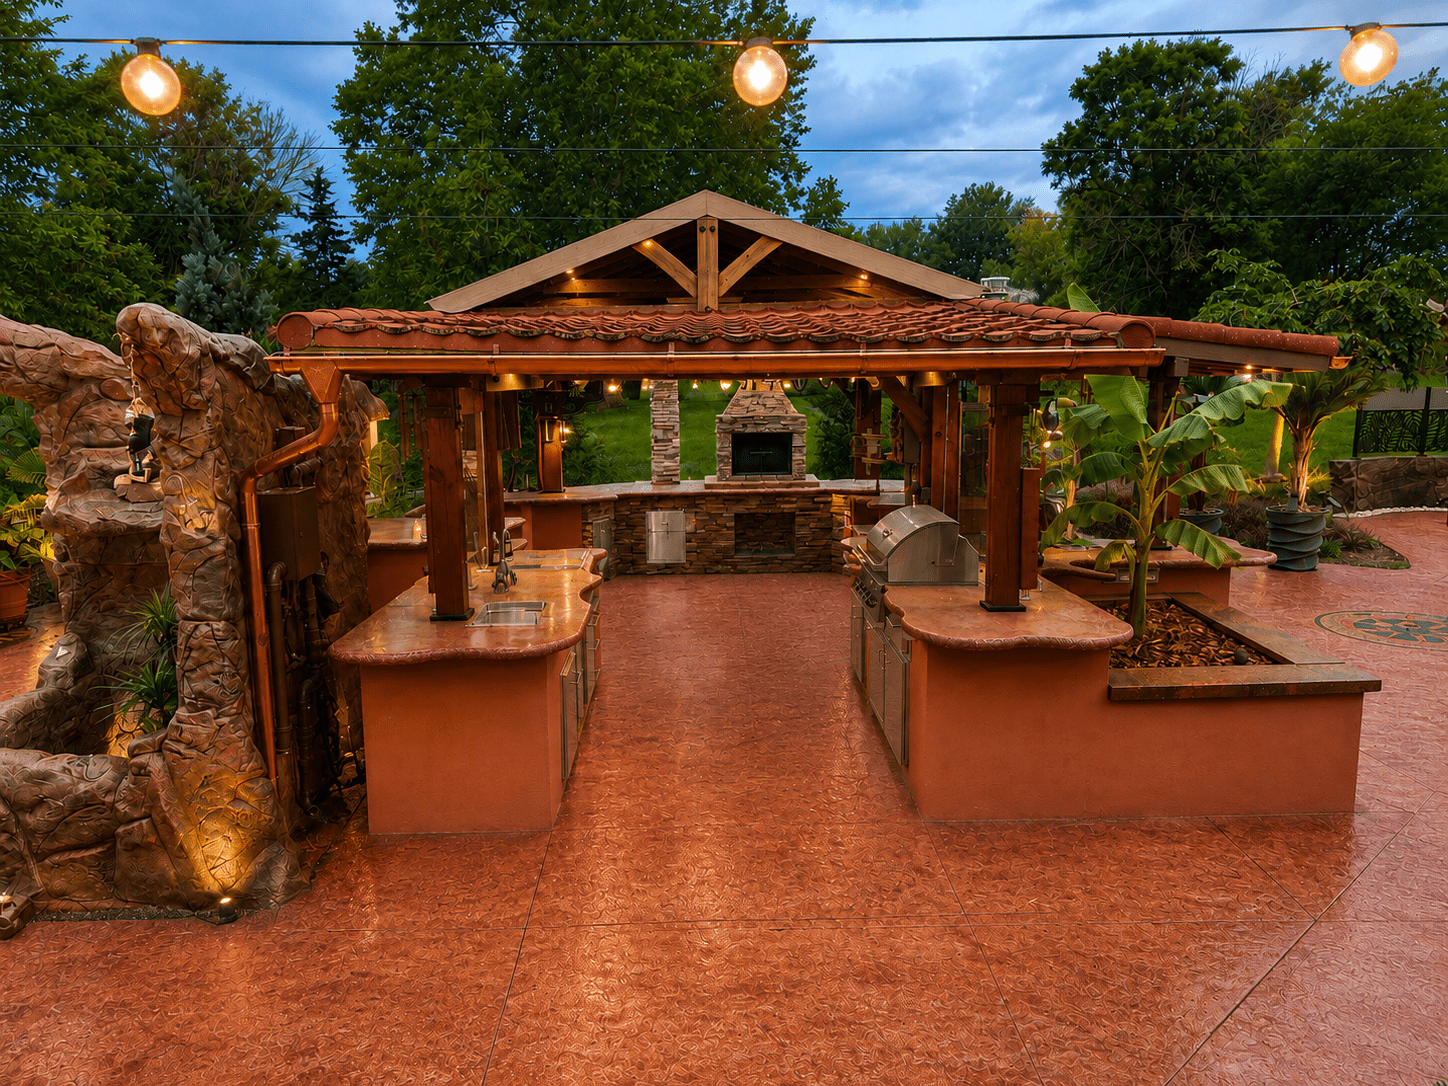

Quick Overview
- Starting point: A $999 cedar gazebo kit I grabbed on clearance at Sam’s Club (~10×10 footprint). Most of the big-box gazebo kits are pretty much the same, so this approach should translate to whatever brand you find.
- What I built: A full outdoor kitchen structure roughly 3x the original size.
- Height gained: Raised ~20–24 inches on concrete columns for roof clearance.
- Key trick: On my build I ran independent posts bolted alongside the gazebo, so the new roof loads onto those rather than the original kit posts.
- Roof: Lightweight DECRA metal panels (looks like European barrel tile, works on a low slope).
- Result: Survived 6 years of storms.
It sat in my garage for six months — a $999 cedar gazebo kit my wife and I grabbed on clearance at Sam’s Club on a whim. After we finished our deck project, I finally pulled it out. But that 10×10 footprint just wasn’t going to cut it.
So I tripled it. Here’s exactly how I expanded a basic gazebo kit into a full outdoor kitchen structure that has held up for years.
Raising the Foundation for Roof Clearance
The stock gazebo I bought sits low — though plenty of the newer models at Sam’s Club and Costco sit higher — so I needed to raise mine about 20–24 inches to create enough headroom for sloped roof extensions on three sides.


I dug 36-inch-deep holes for 12-inch concrete columns — four for the gazebo, plus six more for the expansion posts. If I did it again, I’d go with 14- to 16-inch columns. Twelve inches was tight once I was fitting multiple beams together. (Honestly, larger post bases is my single biggest “next time” lesson — more on that below.)
I set Simpson Strong-Tie post base brackets with 5/8-inch anchor bolts into each column, then mounted the 6×6 gazebo posts, securing them with structural outdoor screws on each side of the base bracket.
One detail that mattered: I oriented each bracket sideways — not facing the new post location — so the bracket and bolts wouldn’t interfere with the future 4×4 posts running parallel to the gazebo posts. It’s worth planning your bracket orientation before you tighten the anchor to the base if you’re doing a side-by-side post system like mine.


Building the Independent Expansion Frame
This was the structural decision I put the most thought into on my own build, so I’ll walk through it in detail.
My expansion posts sit six feet out from the gazebo on three sides. But the roof itself extends nine feet out, with a three-foot overhang past the beam. I also widened the coverage from 10 feet to 12 feet.
For my project, I chose not to load the new structure onto the gazebo posts. Instead, I ran independent 4×4 posts right next to the gazebo posts — both posts sitting on the same base posts — then sandwiched the two together using long stainless steel threaded rods, washers, and nuts — three to four rods per post.
This created one unified structure where my new posts carry the load, rather than relying on the gazebo’s frame. That’s how I set mine up; depending on the kit and your local requirements, you may want to do this differently.
For the beams I used 6×4 pressure-treated structural lumber. Each beam seats on a heavy Simpson column cap that connects the 6×6 post to a 6-inch beam. Mine accidentally arrived as a cap sized for an 8-inch beam, so I used a small spacer underneath to match the bracket height.


Rafters were 2×6 lumber on 16-inch centers, using joist hangers on the gazebo side and notched bird’s-mouth cuts on the outer beam side. The joist hanger side also needed a notch to sit down on the hanger. Each rafter was secured with hurricane truss brackets, plus two long structural screws cross-driven for extra hold.


Choosing a Low-Slope Metal Roof (DECRA)
I chose DECRA decorative metal roofing. It looks like old European barrel tile, but it’s lightweight zinc aluminum. With my shallow roof slope, metal was really the only safe option.
I installed 2×2 purlins across the rafters to support the panels, then screwed everything down with the manufacturer’s fasteners.


Here’s the honest version: almost any metal roof panel will work on a low slope like mine — and a plain corrugated metal roof actually sheds water better than the stone-coated panels I used, which matters most on a low slope. I went with the stone-coated DECRA purely for the look and the theme I was building: it mimics old European barrel tile — Mediterranean style, in a reddish color that ties the whole patio together. That was a design-inspiration choice, not a performance one. If I’d gone with simple corrugated metal panels, I’d have shed water even better and saved both time and money. So pick based on your budget and your look.

The Finishing Details That Make It Look Premium
Small touches are what separate a DIY build from a “this looks intentional” build:
- Blacked-out hardware. I painted every bracket, hanger, and piece of hardware black to match the aesthetic, using SprayMax 2K paint rated for outdoor environments. These days most hardware stores carry pre-blacked-out hardware and parts for outdoor projects like pergolas and gazebos — joist hangers, brackets, post ends, and plenty more. For me, though, it was far cheaper to buy standard zinc-plated hardware — joist hangers, hurricane ties, and the rest — and paint it myself with 2K epoxy than to pay specialty-store prices for the black versions.


- Decorative bolt covers. I used Ozco decorative bolt covers throughout — they hide small screws behind a hefty, old-school bolt appearance. On some of the gazebo bolts I had to redrill the hole in the Ozco cap to enlarge it a bit so the bolt would fit through. I used Ozco hardware all over the project for that rustic, old-world look.
- Wood sealing. The next summer, we stained and sealed all the wood with PPG exterior sealer from Home Depot. They pre-mix it in the color of your choice, and it gives great protection against the elements.
- Aluminum fascia wrap. I wrapped all the side rafters and fascia in pre-painted aluminum fascia metal with a wood-grain imprint. Even though all the wood is pressure-treated, I wanted extra protection from Midwest heat and the elements.
- European copper gutters. The three new roof extensions got custom half-round European copper gutters with round downspouts.
- Hidden reinforcement. At the end, I added metal plates on the inside between the new and old supporting beams, secured with structural lag screws. I tightened them together with heavy-duty metal plates and screws to tie everything together even tighter.


Six Years Later: How It Held Up
This structure has survived six years of storms.
Later, when we poured a new 60’x30′ concrete patio, I drilled into the post bases and tied in new rebar so everything is locked into the slab.
The raised height that worried me at the start turned out perfect: great airflow, fewer bugs at night, and once the new concrete brought the grade up, nothing looks unnaturally tall.


What I’d Do Differently
If I built it again, I’d go with wider post bases — full stop. Twelve-inch columns worked, but bigger pads would have made fitting the beams far easier and given me more margin.
Was the Gazebo Kit Actually a Good Value?
Looking back, I think the answer is yes. At today’s lumber prices, I’m not convinced it would have been cheaper to build the original gazebo structure completely from scratch.
The kit already included a lot of expensive components:
- Premium cedar lumber
- Pre-engineered roof trusses
- Structural beams
- Roof panels
- Hardware
- Brackets
- Decorative architectural details
- Snow-load and wind-load engineering
- Detailed assembly instructions
When you start pricing quality cedar lumber, roof materials, custom trusses, hardware, and decorative brackets separately, the costs add up surprisingly fast. For many homeowners, buying a quality gazebo kit is actually one of the most affordable ways to start a backyard project.
The other thing people often forget is experience. When I bought this gazebo, I had never built an outdoor kitchen. I had never built a structure of this size. I wasn’t even completely sure what I wanted my backyard to become.
The gazebo was actually an impulse purchase. My wife and I saw it on clearance at Sam’s Club for $999 and decided to grab it. At that point, I wasn’t planning a huge outdoor kitchen compound. I wasn’t designing a backyard resort. I simply knew I liked the gazebo.
As the project evolved, so did the vision. The original 10×10 footprint quickly started feeling too small, and that’s when the expansion ideas began.
For an average homeowner, I still think starting with a gazebo kit is easier than starting with a blank piece of paper. The roof design is already figured out. The engineering is already done. The proportions already work. You can stand inside it, visualize the space, and slowly build your ideas around it. That’s exactly what happened in my case.
Would I recommend raising the entire gazebo the way I did? Not necessarily. My particular model only had about 7 feet of clearance to the beams and roughly 9 feet 3 inches to the roof peak. Once I started designing the side roof extensions, I felt the roofline would end up too low, so raising the structure made sense for my project.
Many of today’s Costco and Sam’s Club gazebos are already taller than the model I purchased years ago. If I were building with one of those newer models, I might not raise it at all. For most homeowners, the simplest path is probably to leave the gazebo at its original height and extend the roof coverage outward if additional space is needed.
What matters most is creating a space that works for your family. And despite all the changes, expansions, and modifications, I still love the way this project turned out. The original gazebo became the centerpiece. The extended roof sections blend naturally into the structure. The different roof materials create depth and character. Instead of looking like a collection of additions bolted together, it feels like one complete outdoor living space that was always meant to be there.
What started as a $999 clearance purchase eventually became the foundation for one of the most enjoyable areas of our entire property.
The Takeaway
Any stock gazebo can become the anchor for something much bigger. On my build, I ran independent posts, sandwiched them to the existing frame, extended the roof in sections, and comfortably hit 3–4x the original footprint. How you approach the structure on yours is up to you and whatever your local requirements call for.
This is my build and how I approached it — not a set of instructions. Plenty of areas have their own local requirements, so check yours before you start.
What’s Next?
Finishing the gazebo wasn’t actually the end of the project. It was just the beginning.
Once the structure was complete, I started planning what would eventually become the centerpiece of our entire backyard: a fully custom outdoor kitchen built inside and around the expanded gazebo.
Over the next several years, the space evolved into a complete outdoor cooking and entertainment area featuring:
- A full outdoor bar
- Two sinks, including a large estate-style prep sink
- Custom charcoal shish-kebab grill
- Vision grill (Green Egg–style kamado)
- Custom clay wood-fired tandoor
- Portuguese wood-fired pizza oven
- Asian-style wood-fired cooking station
- Gas grill
- Gas burner cooktop
- Outdoor refrigerator
- Built-in beer kegerator
- Built-in ice chests in the countertops
- Food-prep station with a chute built into the countertop that drops straight to a waste container
- Custom hibachi-style fireplaces built into the bar countertop surface
- Bar TV and entertainment area
- Storage cabinets
- Custom countertops with hand-chiseled-style edges
- LED lighting throughout
- Multiple seating and gathering areas


What started as a simple $999 clearance gazebo eventually became a complete outdoor kitchen compound designed for family gatherings, holidays, backyard parties, and outdoor cooking year-round.
In the next article, I’ll show exactly how I designed and built the outdoor kitchen itself, including the layout, cooking stations, custom countertops, utilities, storage solutions, and the lessons I learned along the way.
If you’re thinking about building an outdoor kitchen of your own, that’s where the real fun begins.
Don’t Miss the Next Build
This gazebo project was only Phase 1. The outdoor kitchen that came next was even bigger, more challenging, and far more rewarding.
I’ll be sharing the complete build process, materials, costs, mistakes, design decisions, and everything I learned along the way. If you’d like to follow the journey and see future Homeject projects, be sure to subscribe so you don’t miss the next article.
Thanks for stopping by and following along.
— Alex, Homeject.com
Tools & Materials
- Wheelbarrow and concrete mix
- Laser level and string lines
- Drill with 5/8-inch masonry bit
- Simpson Strong-Tie post bases and hurricane brackets
- Simpson column caps
- Joist hangers
- Stainless steel threaded rods with nuts and washers
- 6×6 posts, 4×4 posts, 6×4 pressure-treated beams
- 2×6 rafters
- 2×2 purlins
- DECRA (or any low-slope) metal roof panels
- Ozco decorative hardware and bolt covers
- SprayMax 2K black spray paint
- PPG exterior wood sealer
- Pre-painted aluminum fascia wrap
- Half-round copper gutters and round downspouts
Frequently Asked Questions
Can you make a gazebo bigger?
Yes. The way I did it was to leave the gazebo’s frame as-is and build an independent post-and-beam structure around it, then tie the two together. That let me go from a 10×10 footprint to roughly 3x the size on my build.
What kind of roof works on a low-slope gazebo extension?
Metal. On a shallow slope, metal panels shed water far better than shingles — and plain corrugated metal actually sheds better than stone-coated panels. I used a stone-coated metal that mimics European tile purely for the look, but plain corrugated works at least as well for water shedding and costs less.
How deep should the post footings be?
I dug 36-inch-deep holes for 12-inch concrete columns, but I’d go 14–16 inches wide next time for easier beam fitting. Always check your local frost depth and building codes first.

Shop the Build — Tools & Materials
As an Amazon Associate, Homeject earns from qualifying purchases. Some links below are affiliate links — they cost you nothing extra and help support the site. See our affiliate disclosure.
Structural hardware (Amazon)
- Simpson Strong-Tie APVB66 black post base (6×6) — ties each 6×6 post down to its concrete column; black powder-coated so it matches the look.
- Simpson Strong-Tie CC66 column cap (6x post / 6x beam) — seats the 6×4 beam on top of the 6×6 post.
- Black hurricane ties / rafter brackets — lock the rafters to the beams; heavy 13-gauge, pre-painted black.
- Black 2×6 joist hangers — hang the rafters on the gazebo-side beam.
- Black structural connector screws / joist-hanger nails — the rated fasteners for the hangers and hurricane ties.
- Exterior black carriage bolts, washers & nuts — sandwich the new 4×4 posts to the original 6×6 gazebo posts.
- OZCO decorative aluminum cap nuts (bolt covers) — slip over the bolt heads for that rustic, old-world look.
Lumber, concrete & roofing
- Pressure-treated lumber — Home Depot
- Concrete mix — Home Depot
- PPG exterior wood stain & sealer — Home Depot
- DECRA stone-coated metal roofing — I bought mine through ABC Supply
Tools I used
- Circular saw
- Miter saw
- Bar clamps
- Cordless drill
- Impact driver
- Impact driver bit set
- Mason string line
- Level
- Laser level
- Tape measure
- Speed square
- Wheelbarrow
- Work gloves
- Safety glasses
Want a gazebo kit like mine?
Mine was a Sam’s Club clearance kit, but here’s a similar cedar hardtop gazebo on Amazon for reference: Aoxun 10’ x 12’ cedar wood hardtop gazebo.
More Builds You Might Like
- DIY Composite Deck with Glass Railings + LED Lighting
- DIY Patio Bar: How I Built an Enclosed Outdoor Coffee + Cocktail Room
- How to Anchor Artificial Palm Trees in Planters (So They Stay Put)
⚠️ Disclaimer
The content on HOMEJECT is provided for informational and entertainment purposes only. The projects, ideas, methods, tools, materials, and techniques shown reflect my personal experiences and opinions based on my own DIY projects.
This content is not intended to serve as professional construction, engineering, architectural, electrical, plumbing, structural, safety, legal, or code-compliance advice. It should not be considered a step-by-step guide or instruction manual for any project.
Every property, structure, situation, skill level, and local building code is different. Before attempting any project, consult qualified professionals when appropriate and verify all applicable codes, permits, regulations, and safety requirements in your area.
By using information found on this website, you acknowledge that any actions you take are at your own risk. HOMEJECT and its owner assume no responsibility or liability for any injury, damage, loss, or issues that may result from the use of information presented on this site.
Starting an outdoor build? The free DIY home calculators on HOMEJECT — concrete, framing, insulation, and shed materials — are built from real projects like this one and give you real numbers instantly.
Leave a Reply