
I had a 40-inch by 40-inch gap between two columns on my covered patio — dead space most people would have filled with a planter. Instead, I turned it into a fully enclosed DIY patio bar: coffee station, cocktail storage, hidden electrical hub for the entire patio, and WiFi-controlled LED lighting. Every inch is accounted for. Here’s exactly how I built it, what I used, and what I’d do differently.

The 40-Inch Problem (And Why I Enclosed It)
A covered patio has a built-in advantage and a built-in problem. The advantage: protection from weather. The problem: most of the corner space ends up wasted because nobody wants to stick furniture in a narrow gap between structural columns.
My gap was 40 inches wide, 40 inches deep, and full-height. Enclosing it gave me three things at once:
- A finished interior space protected from wind, rain, and dust
- A central hub to hide every electrical run on the patio
- A daily-use coffee bar in the morning and cocktail bar at night

The footprint never changed. The function multiplied.
Framing and Hidden Wiring
I framed all three walls first with pressure-treated lumber, then came the wiring — a ton of it. This little room doubles as the electrical hub for the entire covered patio: the fireplace, TV, speakers, misting system, and downlights all route through here, hidden behind the walls and under the counter.


For the controls, I installed a six-gang switch with Legrand Adorn wall plates in a grey-and-white combo. Custom labels above each switch make it foolproof — no guessing which switch runs what.
If you’re planning to enclose any patio nook, do the framing first, then consolidate every electrical run before you sheath the walls. Once the PVC is up, every future repair becomes a demolition job.
The Door: Andersen 2000 Storm Door + Window Tint
The front wall was framed to accept an Andersen 2000 full-view storm door in black finish, 32 inches wide by 7 feet tall.
The glass came clear from the factory, which would have killed the moody interior LED lighting. The fix: a roll of window tint film from Amazon, applied in about 20 minutes. Total cost under $20. The tint blends perfectly with the black patio frame and gives the interior that lit-from-within bar look at night.
White PVC Wall Panels (Why Not Drywall)

For the interior sheathing I used 1/2-inch white PVC panels from Home Depot. Three sheets covered all three walls.
They aren’t cheap, but here’s why PVC over drywall on a covered patio:
- Won’t rot, swell, or mold in humidity
- Easy to wipe down (it’s a bar — things get sticky)
- Bright white finish reflects the LED lighting beautifully
- No painting needed

I minimized visible screws by placing just a few along the perimeter, then hid them behind shelves, hangers, and accessories. Clean look, no putty work.
IKEA Hacks: Storage That Uses Every Inch

This is where the build gets interesting. A 40-inch box has zero forgiveness — every storage decision has to earn its place.
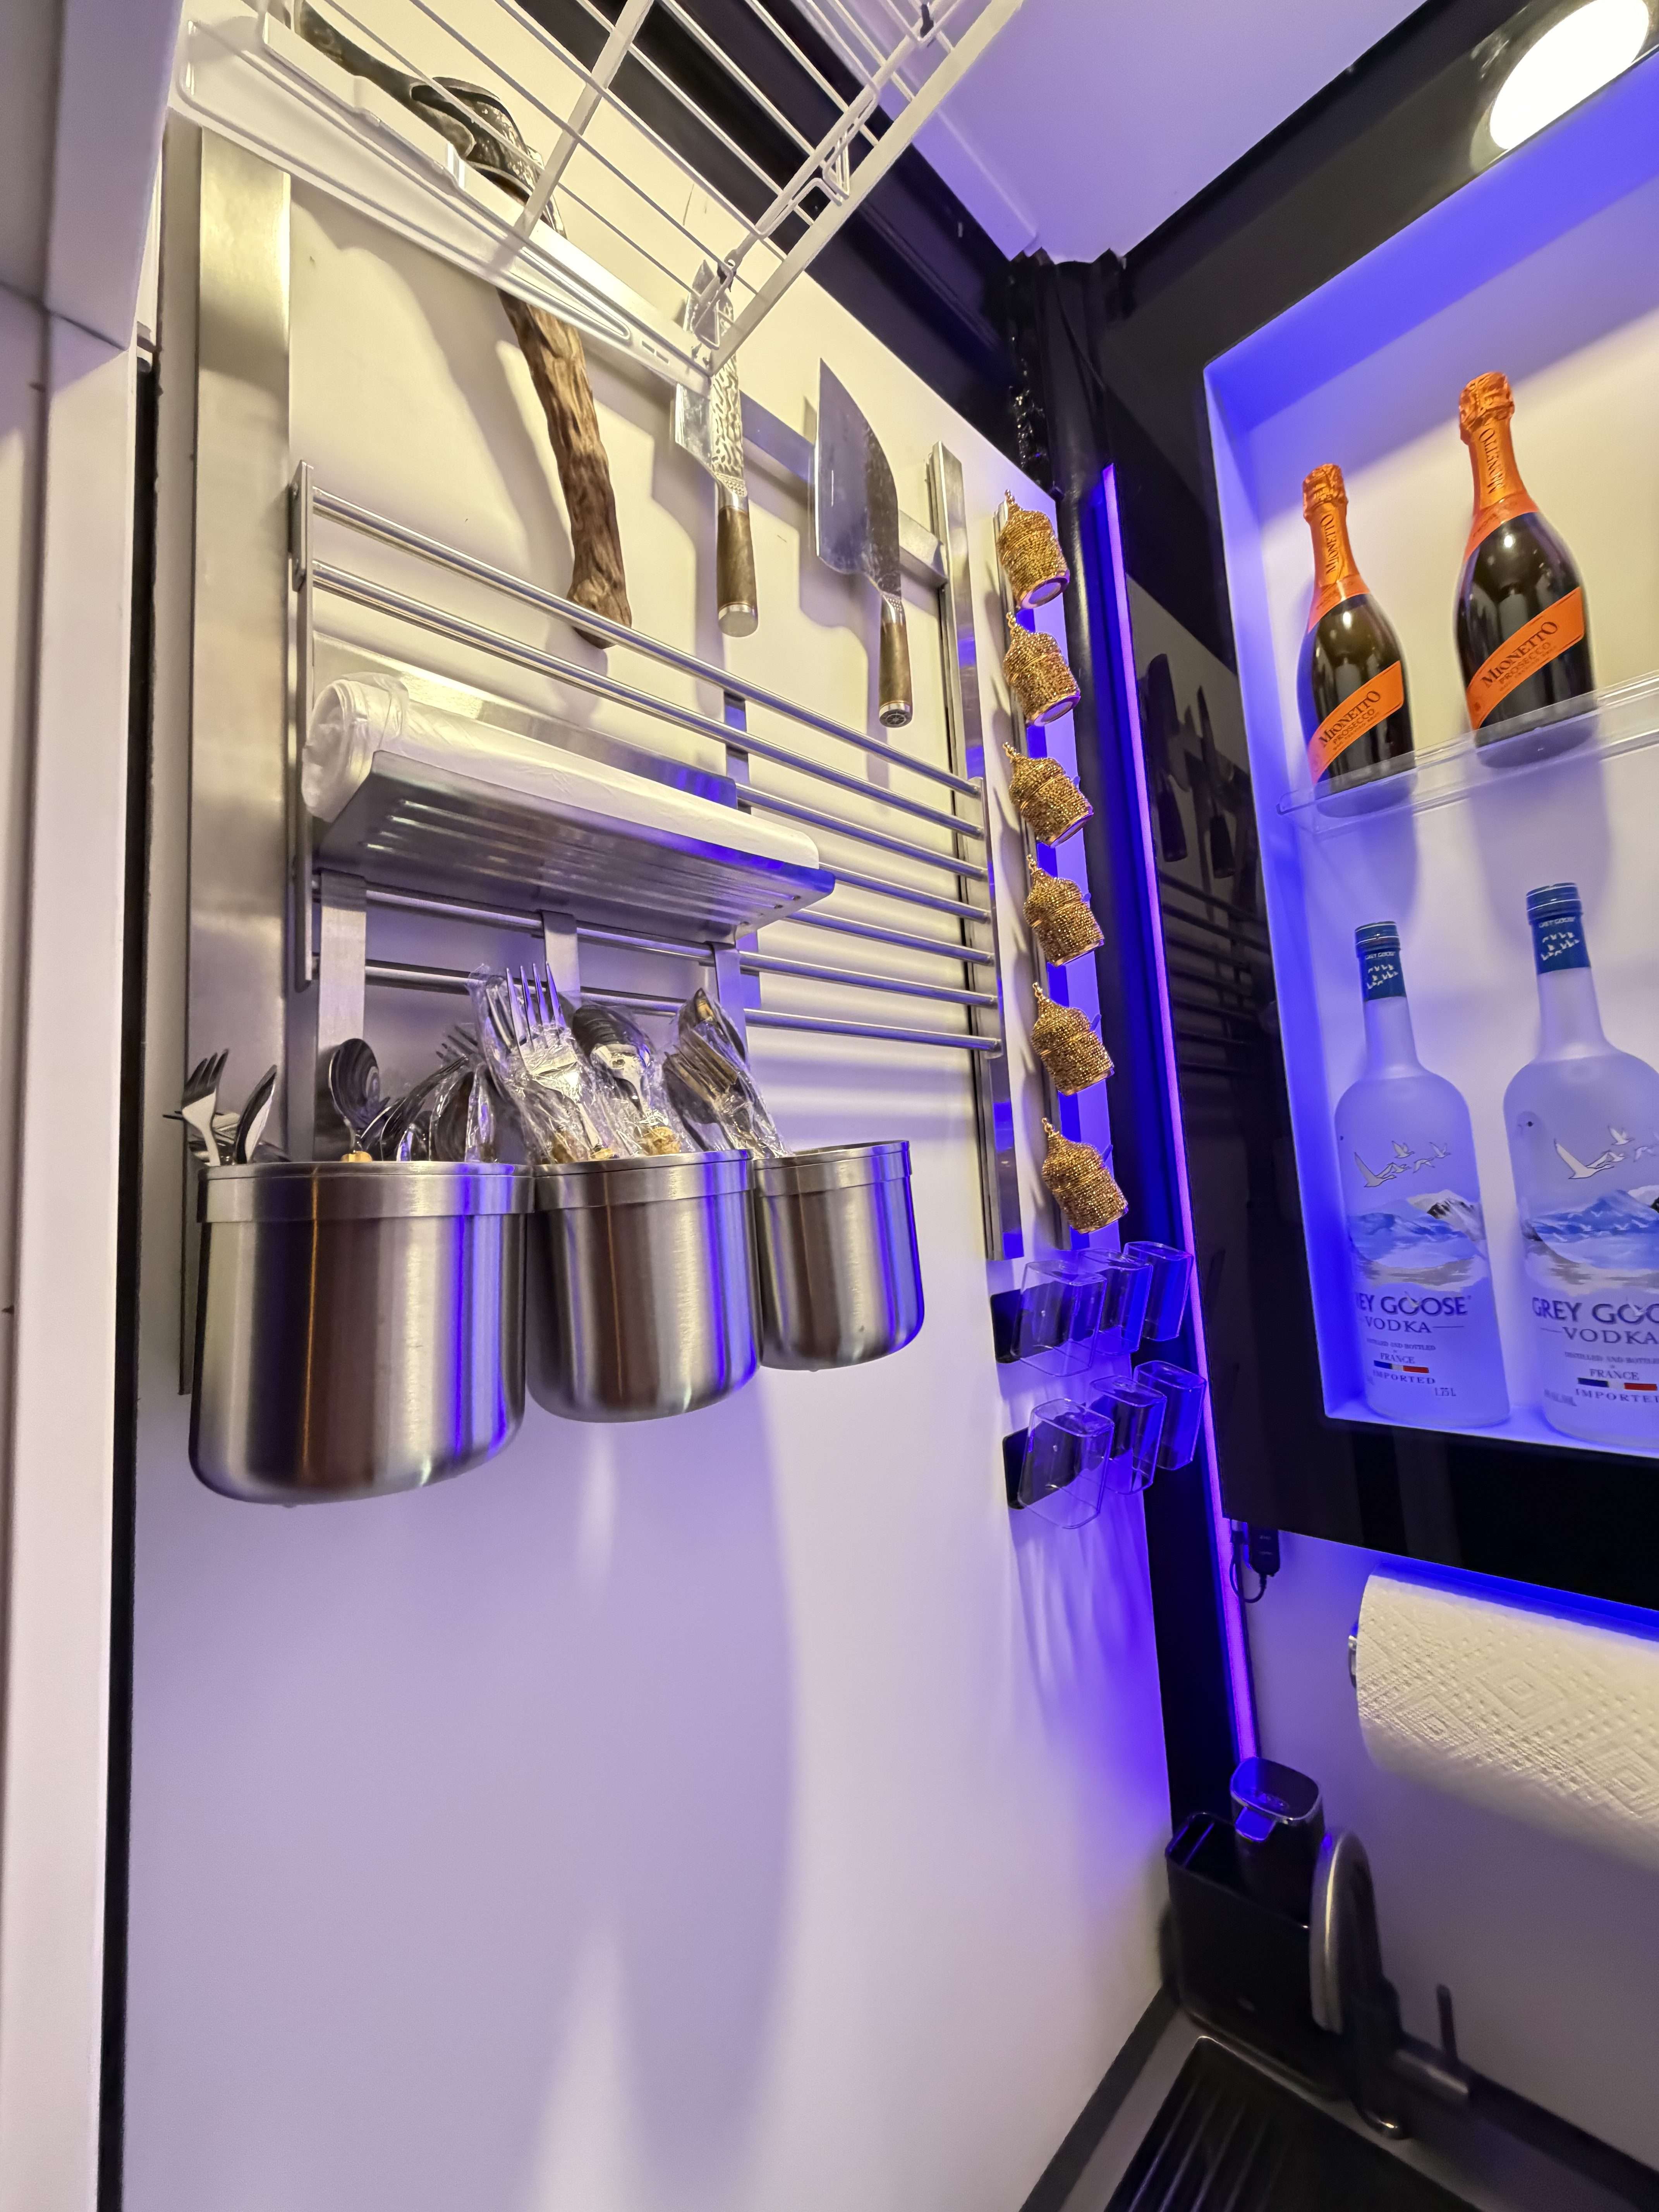
KUNGSFORS Rail System
One full wall runs the IKEA KUNGSFORS suspension rail in stainless steel, with a magnetic knife holder and stainless containers. The same rail family also carries a custom vertical hanger I built for six handmade Moroccan espresso cups, with standard glasses just below.
I broke this hack down in detail in the dedicated post: IKEA KUNGSFORS Outdoor Kitchen Hack: Stainless Wall Storage.

EKBÄCKEN Countertop (Cut Into Two)
The countertop is a standard IKEA EKBÄCKEN black laminate top, cut into two pieces to save money and create a perfectly matching top-and-bottom look. One piece serves as the upper bar counter, the other as the lower shelf. Cutting from a single board kept the grain and finish identical between the two surfaces — a cohesion trick that costs nothing and looks custom.
KOMPLEMENT Pull-Out Drawer
Between the upper and lower counters I slid in an IKEA KOMPLEMENT pull-out tray (39 inches), originally designed for PAX wardrobes. It fit the 40-inch opening almost perfectly with just a half-inch spacer on one side.
It now holds my Disneyland cup collection and bamboo cutlery for outdoor use. Soft-close, full-extension, smooth as a kitchen drawer — for a fraction of the price of a custom-built version.
The Bar Fixtures


Working in a 40-inch footprint means every fixture has to be compact.
- Sink + faucet: A compact graphite-black sink with a matching matte black faucet. The smallest functional combo I could find without going to a bar or RV specialty supplier.
- Espresso machine: A Gaggia Platinum — fully automatic, bean-to-cup with built-in grinder. I’ve had mine for years, and it still pulls cafe-quality shots from a footprint small enough to fit on a 40-inch patio counter.
- Automatic soap dispenser: Touchless, sits on the counter edge.
- Pre-lit bar shelf: Sits up front holding everyday bar essentials.
- Vertical cup holders: Wall-mounted holders for modern square-shaped glasses.
- Hanging souvenir bottles: Up top, suspended from the ceiling for that real-bar atmosphere.
Lighting: WiFi-Controlled LED Everything
This is the build’s signature feature.
Layout:
- Top run: Blue ambient on the ceiling line
- Mid run: White accent on the back wall to highlight bottles
- Lower run: Blue under the counter for shadow effect
- All zones: Switchable color, dimmable, schedulable from phone
Every LED inside the bar room is controlled by a single dedicated WiFi controller with unlimited custom colors. I used black aluminum LED channels with reflectors to focus the light and protect the strips — the reflectors are what give the lighting that crisp linear glow instead of the diffused “Christmas string lights” look you get from raw strip mounting.

The Custom “Biergarten” Sign
Above the door, I mounted a custom LED “Biergarten” sign from Etsy — German text with our family name, Oktoberfest energy. It wires into the same lighting circuit, so the entire room — including the sign — lights up together when the bar is in use.
Right above the door frame on the inside, I added one more shelf holding Disney teacups, glasses, and a decorative Samovar. We rarely use the Samovar, but it adds to the outdoor patio vibe. Nothing wasted, including the airspace above the door.
Final Result

For a 40-inch by 40-inch space, this bar room punches way above its weight:
- Morning coffee station
- Evening cocktail bar
- Hidden electrical hub for the entire patio
- Weather-protected and enclosed
- Fully lit, fully styled, fully functional
This bar room sits right off the deck I rebuilt with composite, glass railings, and three-channel LED lighting — see the full build at DIY Composite Deck Rebuild with Glass Railings + LED Lighting. Right next door, we also built a DIY lamppost village with copper birdhouses and a medieval forged lamp.
Frequently Asked Questions
How big does a patio nook need to be to build a bar?
A functional enclosed bar can fit in as little as 36 inches wide by 36 inches deep, but 40 by 40 is the practical minimum for a sink, counter, drawer, and standing room for one person. Anything narrower works as a coffee station only, without the bar function.
Can you use IKEA cabinets outdoors?
Not directly. IKEA kitchen and storage units are designed for indoor humidity. On a covered patio, an enclosed and weatherproofed nook — like this build with PVC walls and a sealed storm door — creates an indoor-equivalent environment where IKEA components hold up long-term.
Is PVC better than drywall for an enclosed patio?
For a covered outdoor space, yes. PVC panels resist moisture, won’t mold, and don’t require painting. Drywall in a humid covered patio will eventually fail at the seams. The cost premium for PVC is worth it for the longevity and the wipe-clean surface.
What lighting works best in a small enclosed bar?
LED strip lighting in aluminum channels with reflectors gives the cleanest look. Use a WiFi controller so you can change color and brightness for daytime function versus evening atmosphere. Layer the lights in three zones: ceiling, accent, and under-counter. Avoid overhead point sources — they kill the ambiance.
More Homeject Projects
- DIY Composite Deck Rebuild with Glass Railings + LED Lighting
- IKEA KUNGSFORS Outdoor Kitchen Hack: Stainless Wall Storage
- Floating Outdoor Photo Gallery on My Patio Wall
- How to Anchor Artificial Palm Trees in Planters
- Custom Walnut Wall Mount for Kebab Skewers
More Builds You Might Like
- DIY Outdoor Kitchen: How I Turned a Sam’s Club Gazebo Into a Backyard Paradise
- DIY Composite Deck Rebuild with Glass Railings + LED Lighting
⚠️ Disclaimer
The content on HOMEJECT is provided for informational and entertainment purposes only. The projects, ideas, methods, tools, materials, and techniques shown reflect my personal experiences and opinions based on my own DIY projects.
This content is not intended to serve as professional construction, engineering, architectural, electrical, plumbing, structural, safety, legal, or code-compliance advice. It should not be considered a step-by-step guide or instruction manual for any project.
Every property, structure, situation, skill level, and local building code is different. Before attempting any project, consult qualified professionals when appropriate and verify all applicable codes, permits, regulations, and safety requirements in your area.
By using information found on this website, you acknowledge that any actions you take are at your own risk. HOMEJECT and its owner assume no responsibility or liability for any injury, damage, loss, or issues that may result from the use of information presented on this site.
Leave a Reply