If you’ve got LEGO Technic cars sitting on shelves collecting dust, here’s what I did instead. I turned my son’s collection into a gallery wall, and it changed the whole room.

The Collection
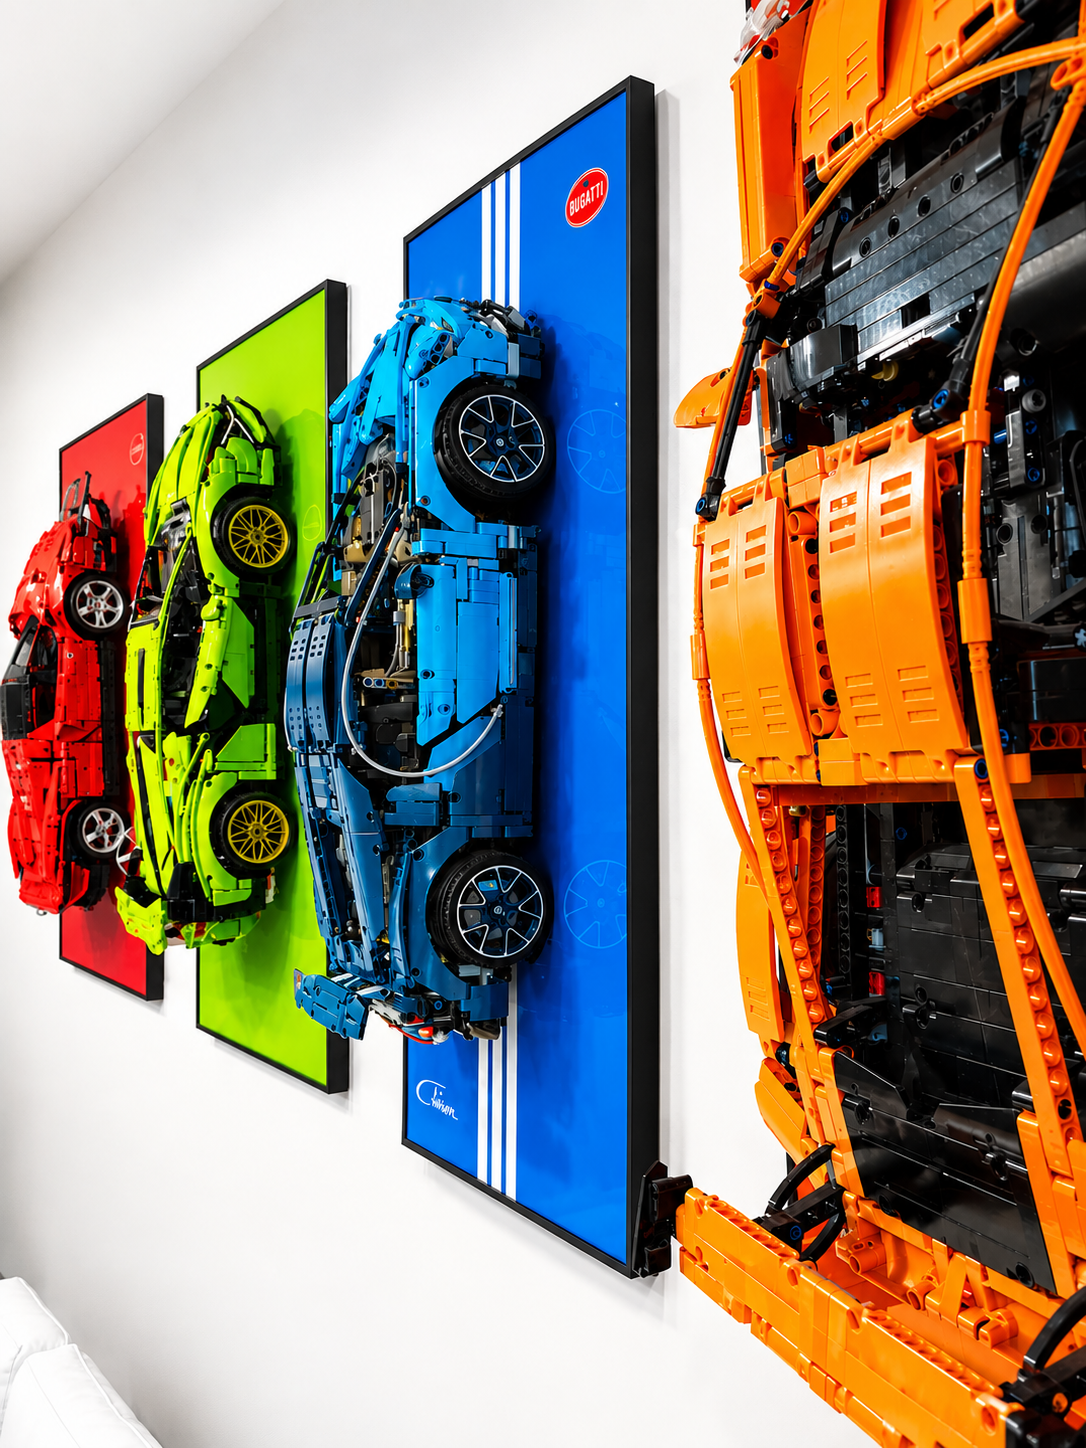
Every Christmas and birthday, LEGO has been on our list without exception. As my son got older — around 10 or 11 — we moved up to the big Technic cars: Porsche, Ferrari, Lamborghini, Bugatti. These are serious builds. Thousands of pieces, four to six days of assembly, models stretching over 20 inches long and weighing three to five pounds each. They’re sculptures. But flat on a shelf they eat space and you lose all the detail. That’s when I decided to put them on the wall. The Porsche 911 GT3 RS and the Lamborghini Sián were the two that started it.
The Display Frames
I found acrylic display panels on Amazon made for models to be displayed on the wall. They look like sleek picture frames — lightweight, glass-like finish — and they come in colors matched to specific models. Each panel has two small hooks inside that latch onto a bar on the car’s suspension. Worth noting: some cars have a different chassis configuration for hanging on the hooks, so check your frame’s instructions for proper placement. Panels vary too — refer to the installation manual that comes with yours.
How I Installed Them


First I mounted the panel to the wall. Each frame has two tabs on the back, like a picture frame. I marked my line with a laser level, drilled two holes, and set drywall anchors with the included screws. The screw spacing has to match your frame’s tabs exactly, so measure carefully.
Here’s the part I learned the hard way: when you hang the panel, make sure both tabs are fully seated on both screws. Feel with your finger or check from the top. My first attempt felt secure but wasn’t fully on. With a model worth hundreds of dollars, you can’t afford a fall.
Once the frame is up, set the car onto the hooks, lining them up under the suspension bar. Hold it, test it, give it a gentle tug. I didn’t let go until I was sure.
For multiple frames, I hung the first, then used the laser level to mark reference points for the next. I spaced the colors on purpose — spreading the two reds apart, alternating with yellow and white — so the whole wall reads as one piece.
Long-Term Results, and a Note on Value


Three to four years later, the acrylic hasn’t yellowed, bowed, or faded. I wipe fingerprints a couple of times a year and that’s it. Against our gray walls they look like modern art. In my opinion they’d look even better on black or white walls — to create that wow contrast effect.
One more thing: these cars appreciate. The Porsche 911 GT we bought years ago now sells for around $1,700 since it was discontinued. Keep your original boxes and manuals in a clean, dry place. The boxes are beautiful in their own right, and they protect the resale value of what’s becoming collectible art.


The project is simple, the result is dramatic, and I have no regrets. We’ve got one more unbuilt kit waiting and another frame already on order.
Tools I Used
Laser level (or a standard level), drill, drywall anchors and screws (included with the frames), a pencil for marking, and the acrylic display panels.
Featured Products
- LEGO Technic Porsche 911 GT3 RS
- LEGO Technic Porsche 911 RSR 42096
- LEGO Technic Lamborghini Sián
- LEGO Technic Ferrari 488 GTE 42125
- LEGO Technic Ferrari Daytona SP3 42143
- LEGO Technic Bugatti Chiron 42083
- Acrylic display panels
Disclaimer: I did this on my own models and I’m sharing my experience for entertainment purposes. This is not an installation manual or a how-to guide. Models and panels vary, and so does the installation — always follow the instructions that come with your own frames and sets.
As an Amazon Associate, Homeject earns from qualifying purchases. The product links above are affiliate links.

More Builds You Might Like
- Custom Foam Inserts + Caster Wheels: My Facom Toolbox Upgrade
- How I Built a 993 Turbo-Look Porsche 911 From a Wrecked SC
- How I Built a Floating Outdoor Photo Gallery on My Patio Wall
⚠️ Disclaimer
The content on HOMEJECT is provided for informational and entertainment purposes only. The projects, ideas, methods, tools, materials, and techniques shown reflect my personal experiences and opinions based on my own DIY projects.
This content is not intended to serve as professional construction, engineering, architectural, electrical, plumbing, structural, safety, legal, or code-compliance advice. It should not be considered a step-by-step guide or instruction manual for any project.
Every property, structure, situation, skill level, and local building code is different. Before attempting any project, consult qualified professionals when appropriate and verify all applicable codes, permits, regulations, and safety requirements in your area.
By using information found on this website, you acknowledge that any actions you take are at your own risk. HOMEJECT and its owner assume no responsibility or liability for any injury, damage, loss, or issues that may result from the use of information presented on this site.
Leave a Reply