
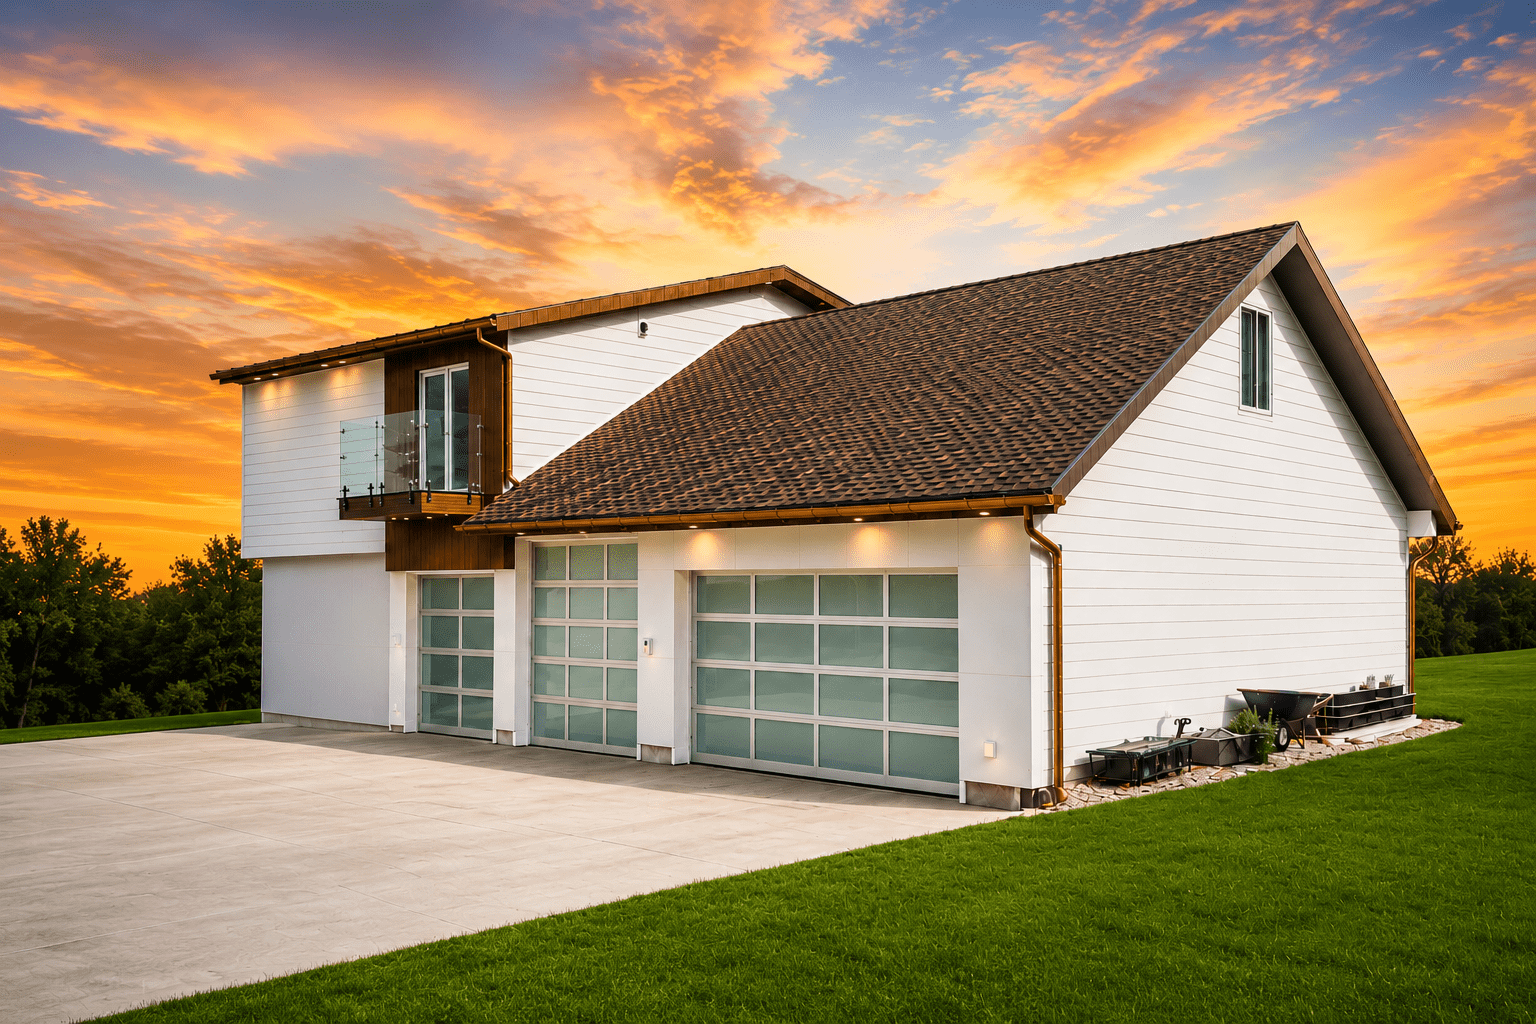


The day both my kids passed their driving tests, my wife turned to me in the driveway and said the thing I’d been avoiding for years: “Where are they going to park?”
I looked at our garage. I already knew the answer. There was no room. There hadn’t been room for a long time. Somewhere between the bikes, the lawn equipment, the half-finished projects, and the cars we already owned, every square foot had quietly been claimed. Two new drivers were about to walk into a garage that was already full.
That was the moment the dream stopped being a daydream — and the moment my detached garage design really began.
Because here’s the truth — I’d been thinking about a real workshop for years. What started as “we need more parking” turned, within about a week, into something much bigger in my head: a detached six-car garage, a dedicated shop, a center bay I could drive straight through into the backyard, and a small apartment up top someday.
And before I ever rented a piece of equipment or poured a footing, I spent nearly two and a half months on planning. Detached garage design, I learned, is its own full-time project — every detail, every constraint, every future need mapped out before the first shovel. At the time it felt slow. Looking back, it was the single most important phase of the whole build — and the part almost nobody talks about.
Start With the Building Code — Everything Else Comes After
If you take one thing from this whole post, take this: before you draw a single wall, before you even finalize what you want, go to your local city or county building authority and ask for the code requirements for a garage like the one you’re dreaming about.
That’s the real starting line. Not the design. The code.
Every city and county plays by its own rules — setbacks, height limits, lot coverage, drainage, how vehicles can even access the property. I sat down with those requirements first, then shaped my wish list to fit inside them. That way I was planning in compliance from day one, instead of falling in love with a design and watching a permit office pick it apart later. Get the code, then build your dream around it.
Once my plans were done, I had a local engineer review and stamp the drawings, and I submitted everything for permits. A couple of revisions later, they were approved and in my hands.
A few things I wish someone had told me up front. My permit was issued for one year, and when the build ran long, I simply had it extended — that’s normal, don’t panic if you need more time. The inspections come in phases, not all at once: footing, foundation, framing, rough-in, utility lines, and so on down the list. And honestly, most inspectors are great. They’re not there to bust you — more than once mine gave me genuinely good advice and recommendations along the way. When the final inspection passes, you get your certificate of occupancy, and that’s the moment it all becomes official.

Then Put Your Detached Garage Design on Paper
With the code in hand, the next step was the boring one everybody wants to skip — and the one that mattered most after permits.
I grabbed a piece of paper and wrote down what I actually needed. Not what looked cool. What the building had to do for my life. How many cars, really. A true workshop or just a corner. A bathroom — someday or never. A vehicle lift down the road. Solar one day. Room for a trailer. Heat and air, or just a roof.
I sat with that list and kept being honest with myself, and one line ended up driving the entire design: the center bay had to be a drive-through. I’m always hauling equipment and trailers into the backyard, and I was done squeezing around the house to do it. That one requirement touched everything afterward — the layout, the foundation, even how I graded the lot. Get the requirements wrong and you’ll feel it in every decision that follows.
The $25,000 Quote That Sent Me Down a Rabbit Hole
I have an architect friend. Good guy. I called him first, told him the vision, and asked what custom blueprints would run me.
About twenty-five thousand dollars.
That wasn’t happening. Not for a building I was going to put my own sweat into.
So I bought Punch Professional Home Design software and spent a week of evenings after work figuring out how it ticked. After about one month of drawing, deleting, second-guessing, and redrawing, I had a complete set of plans built specifically for my property — not a template, not a compromise. Mine.
When the dust settled, the design was a 60-by-32 detached garage: six cars, a dedicated workshop, a small office, a roughed-in bathroom, a drive-through center bay built as a full car wash and detail center, and a full second floor prepped for a future apartment. That car wash and detail station wasn’t an afterthought either — it was one of my requirements from the start, designed in and built in from day one. The doors were a mix on purpose — a tall 9-foot door on the center drive-through bay, and standard 8-foot doors on the rest. That upstairs is still unfinished today, but every utility it’ll ever need was planned and roughed in while the walls were open. I designed it once, so I’d never have to tear into it twice.

Designing Around What Was Already There
Here’s something I want to be clear about: these blueprints weren’t drawn on a blank slate. They were surgically designed around everything my property already had. The placement of the existing driveway, the utility lines, the septic lines, the patio, the backyard layout, and the lay of the existing ground and its slope — all of it was measured, accounted for, and worked directly into the design. I wasn’t dropping a building onto an empty lot. I was fitting one into a yard that already had rules of its own.
And that drive-through bay I was so set on? It made everything harder. Because I wanted to drive straight through the center bay and out the back into the yard, I had to completely rethink the roofing, the load-bearing wall structure, and the rear foundation wall. There’s a slope difference between the front and the back of the building, which meant the front and rear foundation walls didn’t sit at the same height — so I had to build a small ramp inside the bay to make the drive-through actually work.
Why It’s 32 Feet Wide — Not 31, Not 33
There’s a number hiding behind almost every dimension in those blueprints, and it isn’t random: 24 inches. I designed the whole building around the 16-and-24-inch framing formula, because that math is the backbone of how everything in North America gets built. Lumber here is sold in even, two-foot jumps — 8, 10, 12, 14, 16 feet and up — and the sheet goods, plywood, siding panels, and drywall, all come in those same tidy increments. Design to that grid and your material drops into place with almost nothing left over. Design against it and you’re literally paying to cut good lumber into a scrap pile.
If you’re planning the framing for your own build, the free DIY home calculators on HOMEJECT — including the wall framing calculator — will give you exact stud counts, plate lengths, and header material based on your actual dimensions.
So from the very first sketch, I laid out my walls, my heights, and my spans on 24-inch math, specifically to kill waste. That’s also exactly why the garage is 32 feet wide — not 31, not 33. Thirty-two lands clean on the grid, so the siding panels, the plywood, the drywall, and the roof trusses all fit without a fight. The trusses themselves were manufactured at 36 feet to give me a 2-foot overhang on each side, but even that number came straight out of the same even-foot logic. When you let the standard material sizes drive your dimensions instead of fighting them, you save real money, you save time, and your scrap pile stays small.
What I Did While I Waited
Here’s where most people sit on their hands. Permits are “in process,” so they wait. I couldn’t do that. Waiting felt like wasting daylight.
So while the paperwork crawled through approval, I went to work in a different way. I bought the tools I knew I’d need before I needed them — a small backhoe tractor with a front loader, a plate compactor, a concrete vibrator, my Metabo cordless framing and finish nailers, a table saw, scaffolding, all of it. And I started hunting materials months ahead of time, the way I always do: Facebook Marketplace, Craigslist, eBay, liquidation stores, local surplus yards. Rebar, house wrap, flashing tape, Hardie siding, entry doors, fasteners, electrical supplies — I picked it all up in pieces, on deals, long before the build needed it. Every dollar I shaved off there was a dollar that didn’t come out of the project later.
That backhoe tractor with the front loader earned its keep more than anything else I bought. This project moved a staggering amount of material — dirt, gravel, supplies, equipment. I hauled tons of crushed rock, shuttled the plate compactor and other heavy gear around the site, backfilled, dug out the trenches for drainage, and even used it to raise the trusses up to the top. Could I have rented one or hired it out? Sure — but that’s real money, and it means waiting on someone else’s schedule. With my own tractor, I worked exactly when I needed to, on my own time. Scaffolding is the same story — on a long project like this, it’s not a luxury, it’s a must-have, and it’s something you need to budget for from the start.
The wait is also when you line up your people. Anything you’re planning to outsource — excavation, foundation, backfilling, whatever stage you’re not doing yourself — start calling contractors now and book them. The goal is simple: the day permits land in your hands, you already have crews scheduled instead of starting your search from zero. Marketplace, again, was a great way to find reasonable local contractors who actually showed up and did good work.
Before a Shovel Moves: Call for Utility Locates
This one isn’t optional. Before a single shovel hits the spot you’ve marked, call the utility companies and have them locate what’s running underground — water lines, electrical cables, anything buried. In the US, dial 811 or visit 811.com to request a free locate. You want it flagged before you dig, both so it’s safe to work and so you don’t find out the hard way that a pipe or a wire is sitting exactly where your footing needs to go. Knowing what’s down there ahead of time means nothing has to be relocated mid-project.
Plan Around the Weather — Especially Early
Time your project so the weather doesn’t wreck your biggest stages, because the early ones are the most exposed. Excavation and the concrete foundation are completely at the mercy of the sky. Seasonal heavy rain will delay or flat-out alter those stages — equipment can’t dig, can’t haul, can’t move in a soggy, muddy yard. I learned this firsthand: after rain hit while we were working on the dug-out footing trenches, I had to run two pumps just to clear the water before we could keep going.


So plan ahead and try to keep at least the first two months — excavation and foundation — out of your rainy season. It’s the cheapest insurance there is.
The Smartest Thing I Built Wasn’t the Garage
Before excavation could even start, I hit a problem most people don’t see coming: the heavy trucks, the concrete equipment, the machinery — all of it would have chewed up my existing driveway.


So I built a road. A temporary construction driveway running parallel to the real one. I laid down geotextile fabric, brought in load after load of crushed rock, and spread it with the front loader. That temporary road let every heavy machine on the project roll in and out without tearing up my driveway. There was still one short entry stretch of the real driveway they had to use to get onto the property — no way around that — but the temporary road took the rest of the beating.
And don’t skip the fabric — that’s the part that makes the whole thing work. The geotextile reinforces the base under the rock so the stone can’t sink down into the wet dirt. It holds everything together, especially when the ground turns soggy. After heavy rain, I had fully loaded concrete mixing trucks rolling across that road with zero problems. The other payoff came at the very end: when construction was done, the fabric let me scrape all that loose rock right back off the soil instead of having it ground permanently into the dirt. So if you build a temporary road, do it in this order every time — roll the geotextile fabric down first, then the crushed rock on top.
And it taught me a bigger lesson: you can’t just plan the finished building. You have to plan how the project will actually function while it’s a muddy, chaotic job site. Where does the dumpster sit. How do trucks get in. Where do materials live. Where’s the power. And one thing a lot of people forget — where do the concrete trucks and the pump wash out their chutes after a pour. As the builder and the homeowner, that’s on you; you have to give them a spot to clean their equipment once the concrete’s down. I answered all of that on paper before it became a problem in the dirt.

Plan For the You of Ten Years From Now
Anything you might want later, plan for it now.
Before a drop of concrete went down or a sheet of drywall went up, we prepped for the future I couldn’t afford yet but knew was coming — solar, a vehicle lift, heat pumps, the apartment conversion, a full bathroom, more electrical headroom. We dropped in a second 200-amp panel, ran underground conduits and extra wiring, set sewer connections, water lines, drain lines, even copper refrigerant lines for HVAC that doesn’t exist yet. We even picked the spot outside for the future heat pumps and prewired for them.
None of that is in use today. All of it is waiting. And adding any of it later would have meant a fortune and a demolition crew. Doing it while the building was open was dramatically cheaper than doing it later.
Same logic drove the center bay. I went with a 9-foot-tall door on the drive-through bay when I didn’t strictly need it — and I’ve never regretted it. Boats, trailers, lifted trucks, equipment — that one tall bay means the building can say yes to whatever rolls up to it. Future flexibility is worth paying for today.
If You’re Sitting Where I Was
If designing your own garage sounds like too much — it isn’t. You don’t have to teach yourself software the way I did. There are thousands of professional garage plans online, many in the $500-to-$1,000 range, that already come with material lists, structural details, electrical and plumbing layouts, even bathroom and apartment options. Most can be customized and handed straight to an engineer or your building department.
The point isn’t how you get your plan — it’s that you stop dreaming and start acting. Pull yourself together and begin. Turn your dream into a paper-napkin sketch, then turn that sketch into a real set of approved building blueprints. Nobody is going to design and plan your dream but you. So start acting.

Looking Back
Two and a half months. That’s how long I planned before the first shovel ever touched the ground. At the time it felt like forever. Now it’s the part I’m proudest of.
Because today that garage isn’t just parking. It’s storage, it’s my workshop, it’s future living space, and it’s a building that grows with me instead of boxing me in. None of that happened by accident. It happened on a piece of paper, on a laptop at my kitchen table, on a gravel road I built before I built anything else.

This is just the planning and design chapter. In the posts ahead, I’ll take you through the rest of it — site prep, excavation, drainage, waterproofing, the foundation, the concrete floors, framing, roofing, electrical, insulation, siding, and the interior finish. The whole journey, the real way it happened.

But if you take one thing from my story, take this: your dream garage doesn’t start with a foundation. It starts with your local building code, a piece of paper, and the honesty to write down what you actually need.
Everything I built started right there.
⚠️ Disclaimer
The content on HOMEJECT is provided for informational and entertainment purposes only. The projects, ideas, methods, tools, materials, and techniques shown reflect my personal experiences and opinions based on my own DIY projects.
This content is not intended to serve as professional construction, engineering, architectural, electrical, plumbing, structural, safety, legal, or code-compliance advice. It should not be considered a step-by-step guide or instruction manual for any project.
Every property, structure, situation, skill level, and local building code is different. Before attempting any project, consult qualified professionals when appropriate and verify all applicable codes, permits, regulations, and safety requirements in your area.
By using information found on this website, you acknowledge that any actions you take are at your own risk. HOMEJECT and its owner assume no responsibility or liability for any injury, damage, loss, or issues that may result from the use of information presented on this site.
Related on Homeject: You might also like the kitchen-to-garage fiberglass door upgrade and 60×32 garage foundation build.
Leave a Reply