
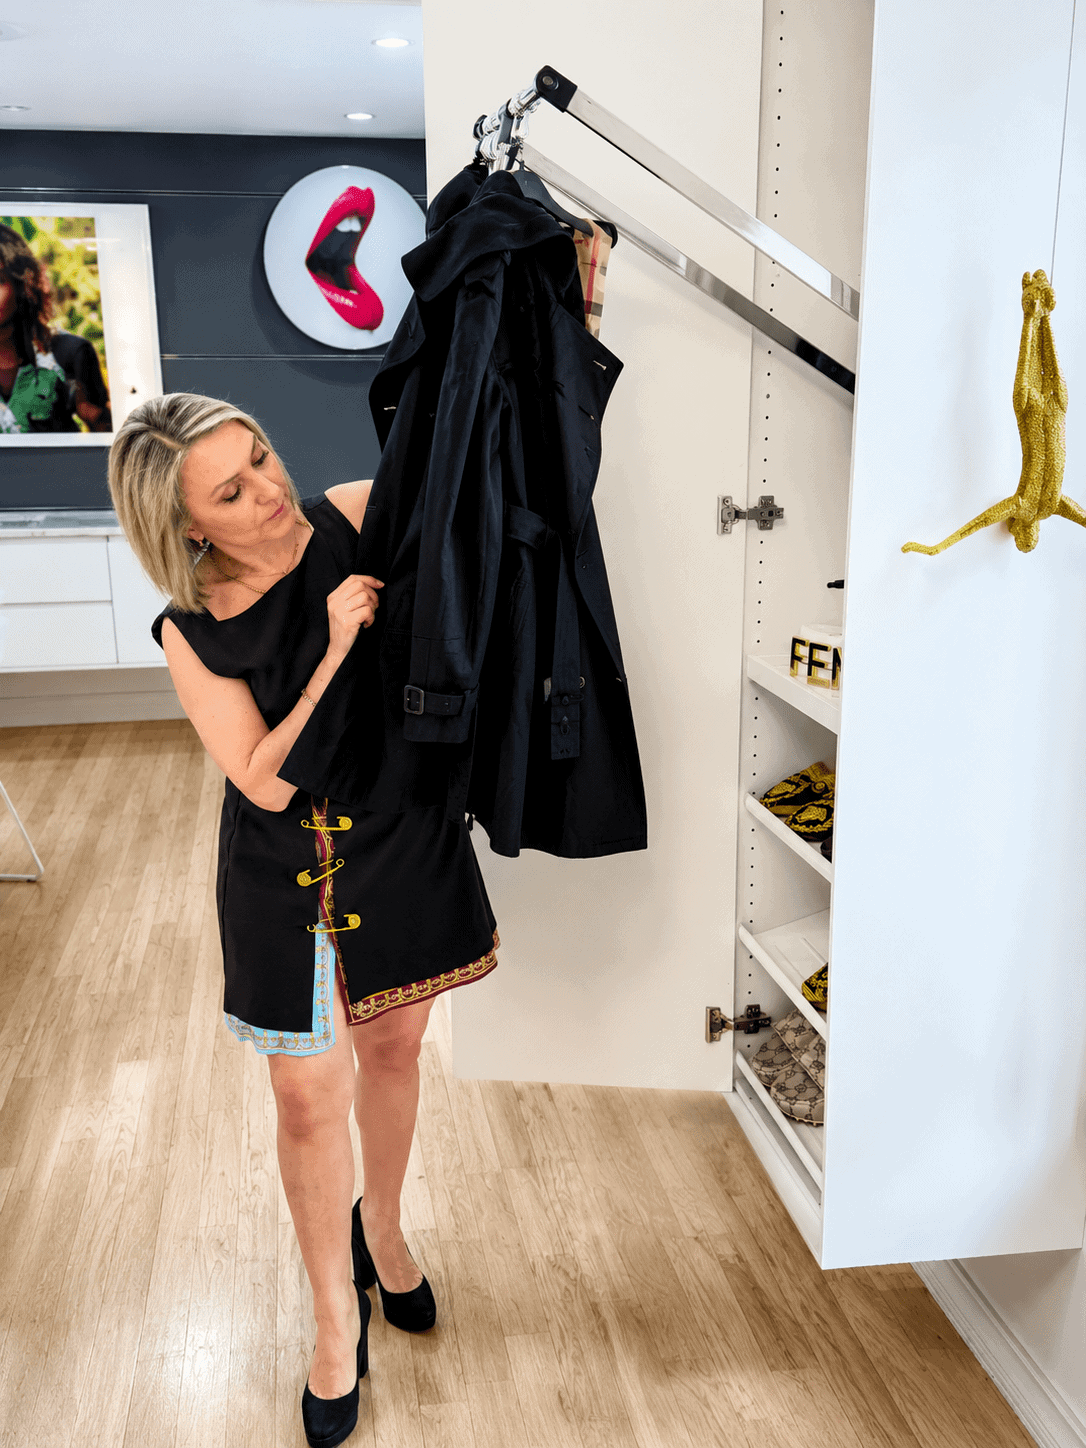


“Every time someone came over, the same little awkward moment played out at my front door. A guest walks in, takes off their coat, and… now what? The nearest closet was a good twenty steps down the hallway, so either I’d haul their stuff away like a coat-check guy or it ended up draped over a chair. For something so small, it bugged me every single time. It just didn’t feel welcoming. That’s what made me try this IKEA PAX hack.”
⚠️ Important Safety Notice — Wall-Mounted PAX
IKEA wardrobes can tip over and have caused serious and fatal injuries, especially to children. This post documents a personal build — it is not an installation manual. PAX must be anchored into wall studs (not drywall alone) with appropriate hardware. Before mounting: (1) locate and anchor into studs, (2) confirm the wall can carry the load, (3) keep children from climbing on it, (4) consult a professional if unsure. Do not replicate without understanding your wall type and local codes.
So I decided to fix it — and it turned into one of my favorite little builds. I turned it into an IKEA PAX hack — I took a plain IKEA PAX wardrobe and floated it on the wall, eight feet from the front door, thirteen inches off the floor. People walk in now and think I paid a fortune for custom built-in furniture. I didn’t. Here’s exactly how I did it.


Why I Needed This IKEA PAX Hack
I wanted something sleek and right at the entry — grab-a-hanger-the-second-you-walk-in convenient. But a normal wardrobe sitting on the floor would’ve looked like a fridge dropped in my hallway: bulky, heavy, and in the way. We also run robot vacuums, and I didn’t want a big box for them to bump into every night. The answer was to get it off the floor entirely — a shallow 19-inch-wide, 13-inch-deep, 79-inch-tall PAX, floating on the wall.


The IKEA PAX Hack PAX Isn’t Supposed to Allow
“Here’s the key to this IKEA PAX hack that nobody tells you: PAX isn’t made to hang on a wall. But IKEA’s SEKTION kitchen cabinets are — they hang off galvanized suspension rails and wall brackets. So I borrowed that system. I grabbed one SEKTION suspension rail and cut it into two pieces with a hand saw, plus four brackets, pulled the original PAX hardware, and the kitchen brackets dropped right into the exact same holes. (Full parts list with IKEA article numbers and links is at the bottom of this post.)”
Two rails, and the trick to landing the bottom one
I mounted the top rail first, screwed straight into studs, and hung the empty PAX box on it. Due to the heavy weight of the PAX itself, plus the drawers and the pull-down rod, I needed to add a second rail down low to spread the load across two points instead of one. I actually learned this two-rail trick on my own custom kitchen build, where I mounted tall wall cabinets the exact same way — I’ll link that post here once it’s up.
Finding the exact spot for the bottom rail is where people get stuck, so here’s how I did it: with the box already hanging from the top rail, I reverse-engineered the position so the lower brackets landed exactly on the rail with zero clearance — that way the cabinet sits locked onto both rails. I slid the second rail onto the lower brackets while the box hung, marked exactly where it landed on the wall, took everything back down, screwed the bottom rail into the studs on those marks, and rehung it.


Making it actually float
A few small details are what sell the floating look. Since it no longer sits on the floor, I trimmed a couple of inches off the bottom — right below where the bottom shelf ends — to give it a clean, finished edge. Then I wrapped every side in IKEA FORBATTRA cover panels and let them hang just past the front edge to create a subtle reveal. That little shadow line is the difference between “IKEA box on a wall” and “where did you buy that?”


One thing I learned the order matters on: if you’re going to wrap the cabinet like I did, mount the door first. Doors come in different thicknesses, so hanging it first shows you exactly how far off the wall the box needs to sit for the door to finish flush with the wrapped sides. Mine ended up sitting about 15 inches off the wall. Heads up: the exact door I originally used has since been discontinued, so in the parts list I’ve linked a compatible same-size door in white (IKEA FORSAND).


The inside, where it gets fun
With the top now sitting over seven feet up, a normal closet rod would’ve been useless — nobody’s reaching that. So I put in a pull-down rod with gas shocks. Quick tip: buy the smallest pull-down rod you can find. I got a 21–26-inch one and cut it down with a hand saw to fit between the mount arms. The wider rods are built for heavier loads, which makes them stiffer and harder to pull down — so a small one you trim to size pulls much easier. I mounted fixed hooks right on the bar, so there are no bulky hangers hogging space in a skinny cabinet.


Under that, an IKEA KOMPLEMENT pull-out tray for keys, bags, and the little stuff, plus three IKEA KOMPLEMENT shoe shelves that hold six pairs. All of it is made for PAX, so it just clicked in — no modifying anything.
For the door I kept it clean: a simple three-hinge panel, no handles at all. Instead I used an IKEA KOMPLEMENT push opener — press once and it pops open, press to close and it clicks shut. On one side I hung a floating art piece (that’s its own little IKEA hack — a story for another post), and on the other I added four wall hooks for overflow coats and bags. They blend in so well they honestly look like they came standard with the PAX.


Optional: add the lighting
One easy upgrade I’d recommend: PAX has its own sensor lighting system, so it’s simple to drop in a couple of light bars — I’d run one up top, one in the middle, and one down in the shoe-rack area. The best part is the lighting is already sized for this cabinet, so it just fits with no fuss. Link is in the parts list below.


The payoff
“Now, with this IKEA PAX hack complete, the wardrobe floats clean off the floor, the robot vacuums slide right under it, and the second someone walks in they’ve got a spot for their coat and shoes. It’s one of those small projects that punches way above its size; every guest comments on it.”


“Two tips if you try this IKEA PAX hack yourself: even with the wall-rail system, I wouldn’t load it up with super heavy stuff — and whatever you do, hit the studs. And stick with the shallow 13-inch-deep PAX; anything deeper looks chunky and puts more load on the wall.”
IKEA PAX Hack: Full Parts List (Article Numbers + Links)
- IKEA PAX wall-mounted storage frame, white (19 x 13 x 79 in)
- IKEA SEKTION suspension rail, galvanized — buy 1, cut into 2 with a hand saw
- IKEA wall-mount brackets — replacement parts #124518 + #124516 (you need a set of 2)
- IKEA FORBATTRA cover panel, high-gloss white
- IKEA FORSAND door, white — compatible same-size replacement (my original door is discontinued)
- IKEA KOMPLEMENT push opener
- IKEA KOMPLEMENT pull-out tray, white
- IKEA KOMPLEMENT shoe shelf, white (x3)
- IKEA OVERSIDAN LED wardrobe lighting strip with sensor, dimmable (optional)
- Pull-down closet rod, telescoping 21–26 in (Amazon — cut to fit)
- Hook bar for the pull-down rod (Amazon)
- Gold & white wall hooks for the side (Amazon)
Tools I used
- Level
- Drill
- Pencil
- Utility knife (for cutting the backing board)
- Hand saw (for cutting the suspension rail, base panels, and pull-down rod)
- Tape measure
- Screwdriver and screws
More from Homeject
“If you liked this IKEA PAX hack, check out my IKEA KUNGSFORS outdoor kitchen hack, and browse the rest of my IKEA hacks for more big-box-to-bespoke upgrades.”
Some links in this post are Amazon affiliate links (tag: homeject-20). As an Amazon Associate, Homeject earns from qualifying purchases — at no extra cost to you.
⚠️ Disclaimer
The content on HOMEJECT is provided for informational and entertainment purposes only. The projects, ideas, methods, tools, materials, and techniques shown reflect my personal experiences and opinions based on my own DIY projects.
This content is not intended to serve as professional construction, engineering, architectural, electrical, plumbing, structural, safety, legal, or code-compliance advice. It should not be considered a step-by-step guide or instruction manual for any project.
Every property, structure, situation, skill level, and local building code is different. Before attempting any project, consult qualified professionals when appropriate and verify all applicable codes, permits, regulations, and safety requirements in your area.
By using information found on this website, you acknowledge that any actions you take are at your own risk. HOMEJECT and its owner assume no responsibility or liability for any injury, damage, loss, or issues that may result from the use of information presented on this site.
Disclosure: HOMEJECT is an independent DIY project journal and is not affiliated with, sponsored by, or endorsed by IKEA or any other brand mentioned. Product names such as SEKTION, PAX, KUNGSFORS, DETOLF and BILLY are trademarks of their respective owners, used here for identification and descriptive purposes only (nominative fair use). This post documents a personal build and is not an official installation guide.
Leave a Reply